Google OAuth
By default, your integration uses Unipile’s OAuth credentials. If you want a full white-label experience when end users connect their Google account from your app, you need to create and use your own Google OAuth credentials. This is optional and requires extra setup.
Google OAuth Verification Process Overview
Google has a OAuth Verification process, mandating third-party applications to submit an application to Google for verifying their use of Google user data. You need to undergo Google's app verification process, application whitelisting, and/or a security assessment by external auditors ($500 by year).
To begin your development, you must complete the initial phase, which involves "Creating a Google Developers Console Account and Project". Once your development is complete, you can then proceed to the second phase: "Generate your Demonstration Video". Following that, you can move on to "Whitelisting & Security Review for Restricted Scopes".
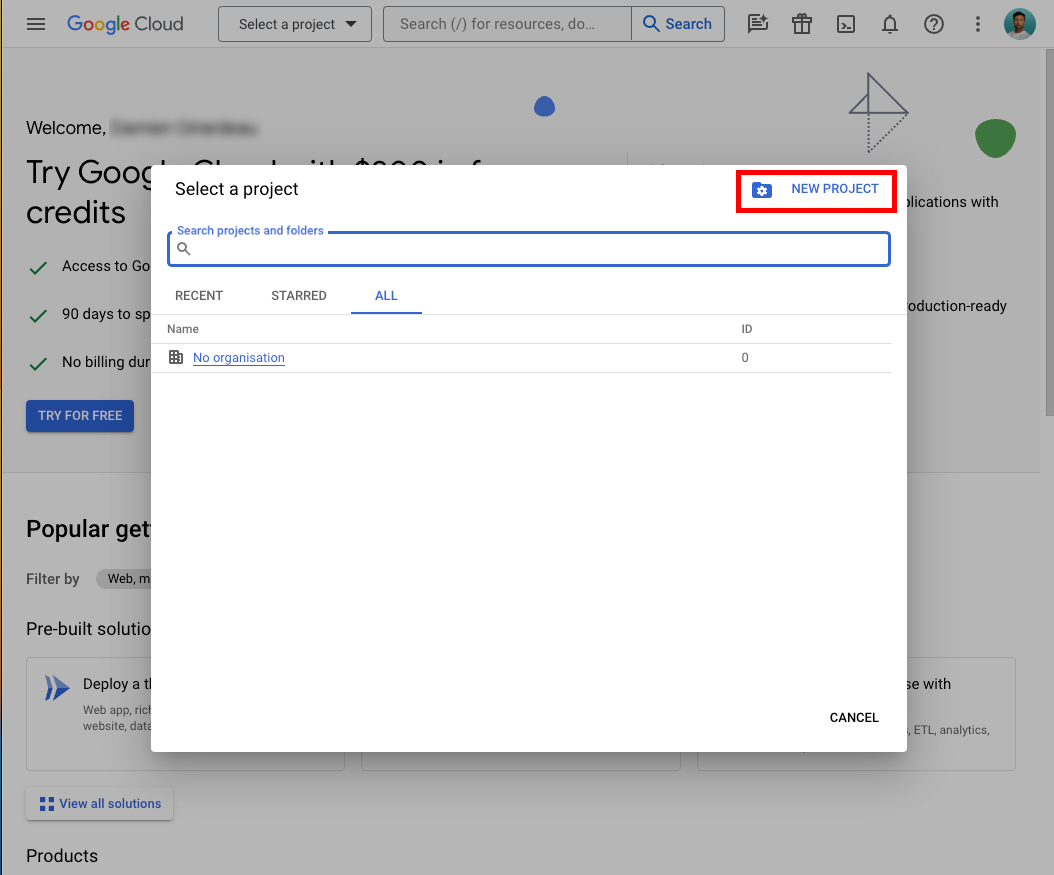
Create Google Developers Console Account and Project
Sign up on the Google Developers Console and either create a new project or use an existing Google project.
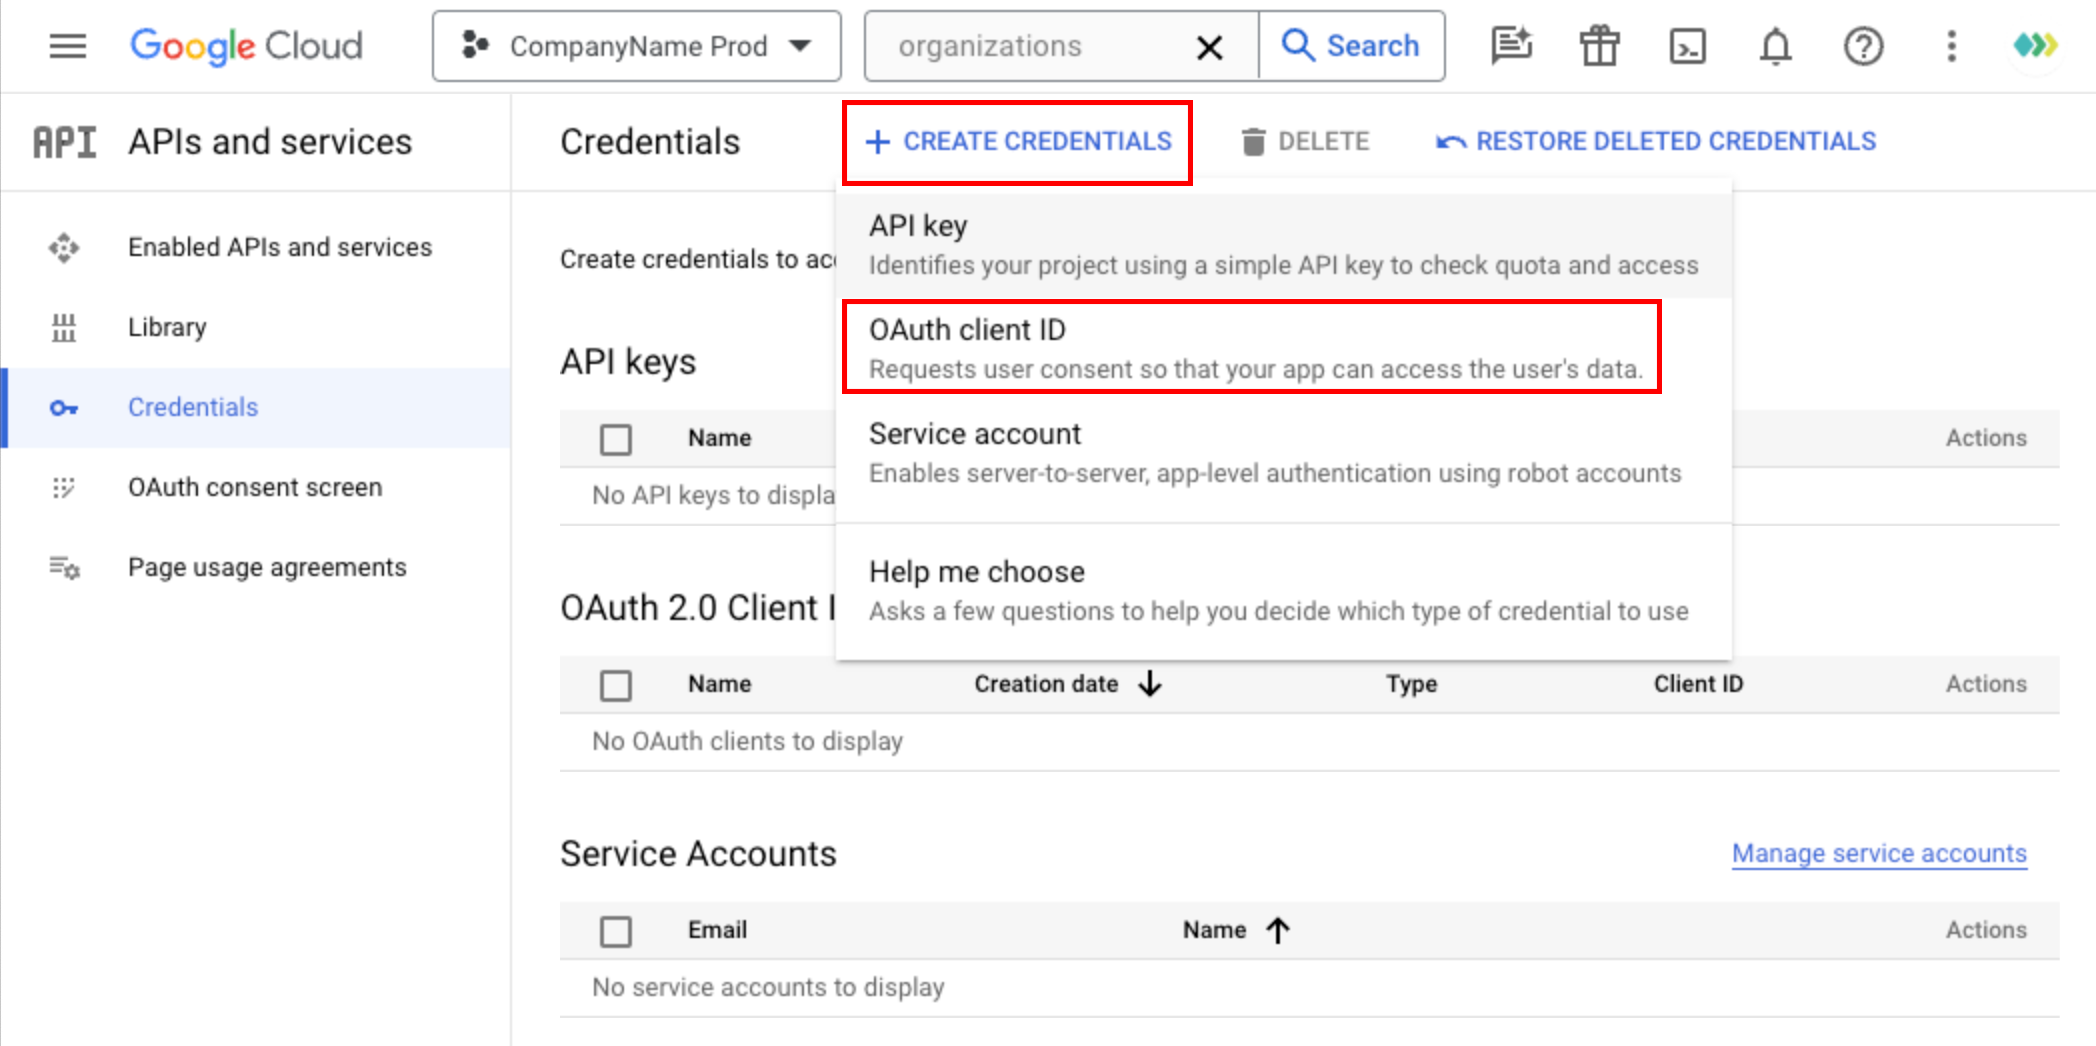
Navigation Menu -> APIs & Services -> 'Credentials'
- Navigate to the 'Credentials' section in the Google Developers Console.
- Create 'OAuth Client ID' credentials to gain access to your enabled APIs:
- Application type: Web application
- Name: Your internal name
- Add 2 Authorised redirect URIs:
https://{{YOUR_DSN}}/api/v1/hosted/google_auth_request_callback (you can find your DSN in top right of Unipile Dashboard, example https://api1.unipile.com:13211/api/v1/hosted/google_auth_request_callback
https://{{YOUR_DSN less port}}/api/v1/hosted/google_auth_request_callback/port{{YOUR_DSN less domain}} (you can find your DSN in top right of Unipile Dashboard, example https://api1.unipile.com/api/v1/hosted/google_auth_request_callback/port13211\ - Click "CREATE"
- Add Client ID and Client Secret to Unipile Dashboard > Settings > Google OAuth
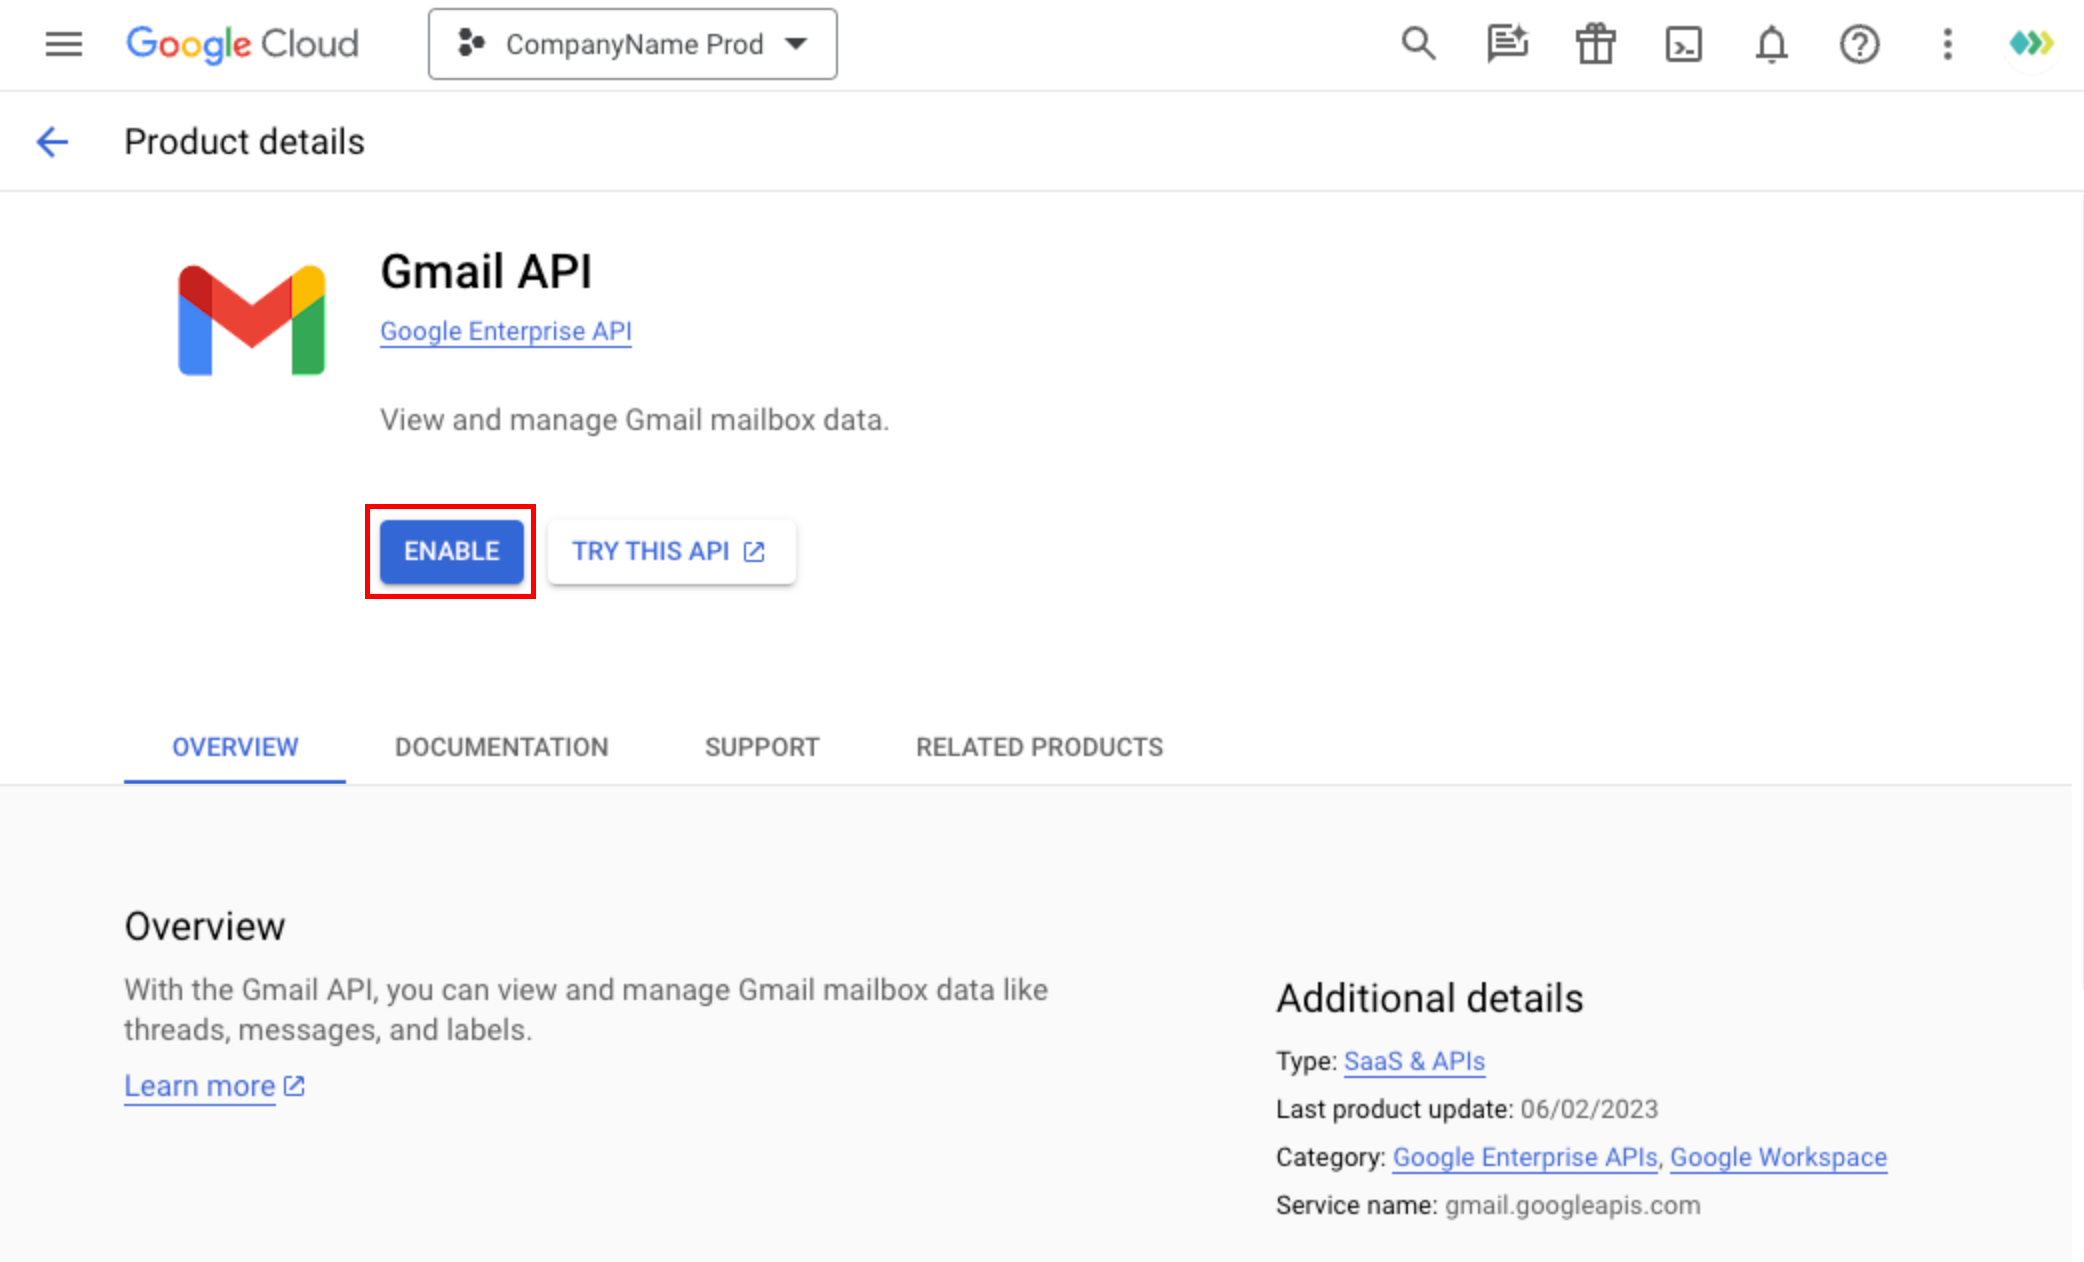
Navigation Menu -> APIs & Services -> Library
- Go to the 'Library' section in the Google Developers Console.
Enable Required API Libraries:
Search for and enable all API Libraries that your application will need: Gmail API
- If you want to use Calendar API, you need to enable Google Calendar API too : https://console.cloud.google.com/apis/library/calendar-json.googleapis.com
Navigation Menu -> APIs & Services -> Enabled APIS and Services
- Access the 'Enabled APIS and Services' section in the Google Developers Console.
Check Enabled APIs: Review and verify the full list of APIs you have enabled within your Google Project.
The Dashboard provides an overview of all the enabled APIs, allowing you to confirm the status of your selected APIs for your project. Use this section to ensure that the necessary APIs are enabled for a seamless integration with your application.
Navigation Menu -> IAM & Admin -> IAM
- Follow these steps to add Unipile as a Project Owner throughout the Verification Process:
- Click Add: Navigate to IAM (Identity and Access Management) and click "Grant Access."
- Add Support Email: Add [email protected] as a Project Owner.
- Accept Invitation: The Unipile team will subsequently accept the invitation, verifying authorization for the' unipile.com' domain, necessary for hosting the authentication flow.
- Inform Unipile: Notify your Unipile contact once you've completed this step, and include the name of your Google Project.
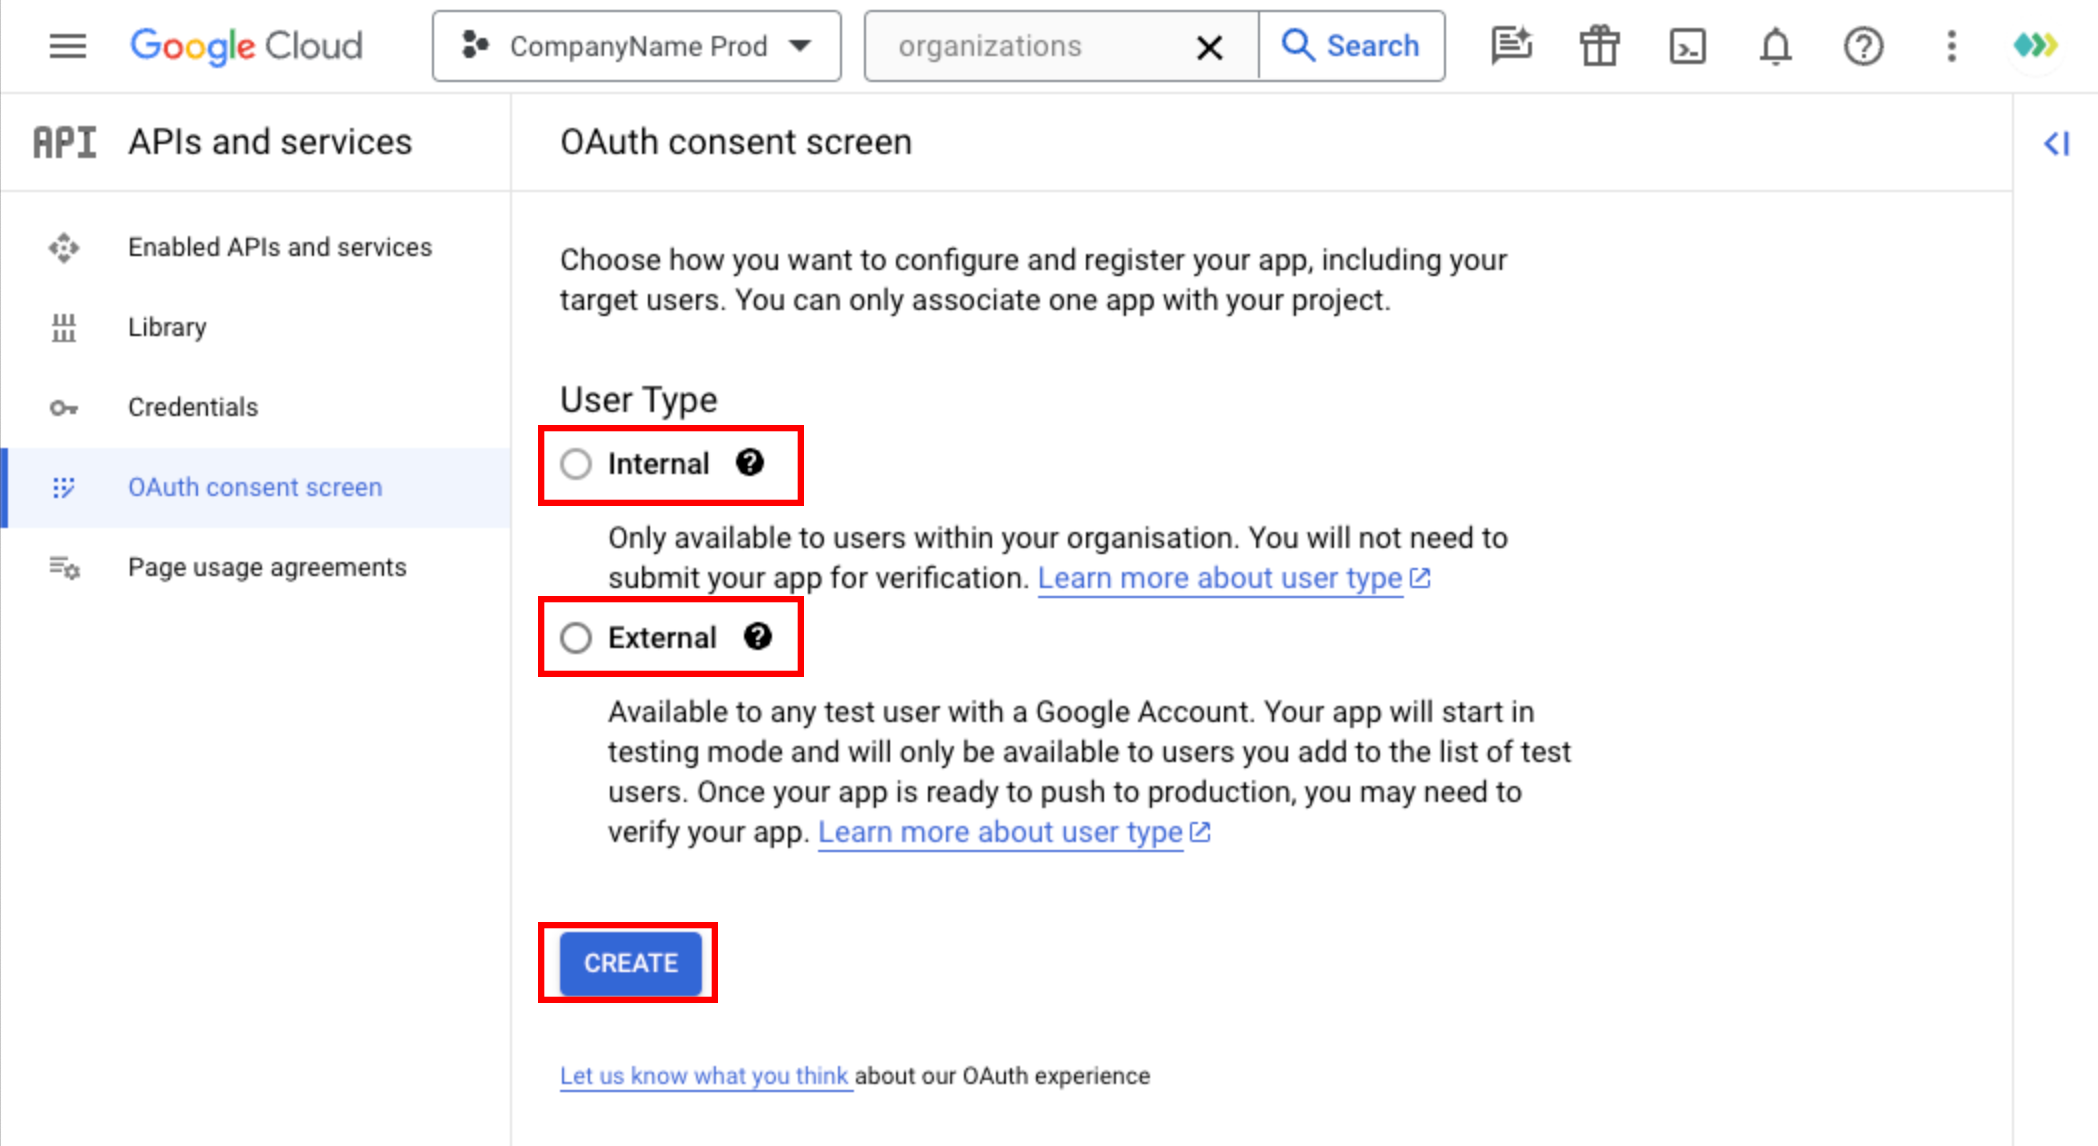
Navigation Menu -> APIs & Services -> OAuth Consent Screen
Throughout the implementation, you may keep your Google Project in different states:
- 'User Type' as 'Internal': In this mode, your app is limited to Google Workspace users within your organization.
- 'User Type' as 'External' & 'Publishing Status' as 'In Testing':
Note: While 'In Testing,' you need to add Test Users. Tokens expire in 7 days and require users to re-authenticate.
For more information on Publishing Status, click here.
For details on User Types, click here.
Ensure that you select the appropriate User Type and Publishing Status based on your project's testing and deployment phase.
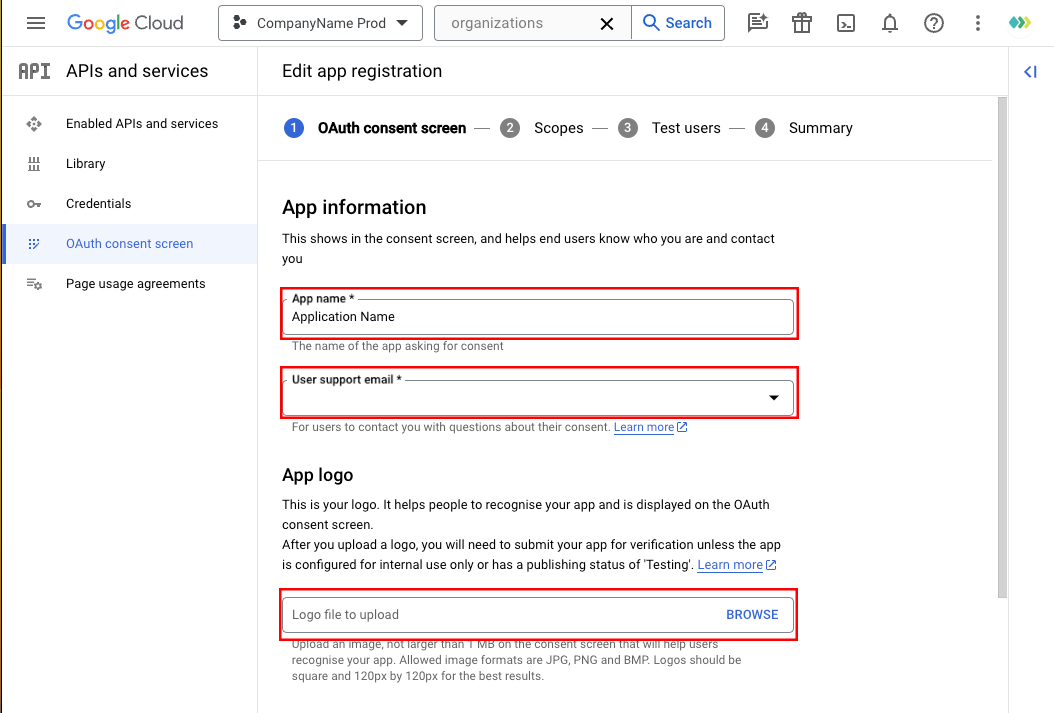
OAuth Consent Screen Section -> App Information
Ensure the following information is provided:
- Enter Your Application Name: Specify your application name.
- User Support Email: Include an email address for users to contact with questions about their consent. Recommend using an alias or distribution list with relevant parties included.
- Add Your App Logo: Upload your application logo for visual identification.
Completing this information in the OAuth consent screen section is essential for users to understand and trust your application during the consent process. Include accurate details and branding elements for a smooth user experience.
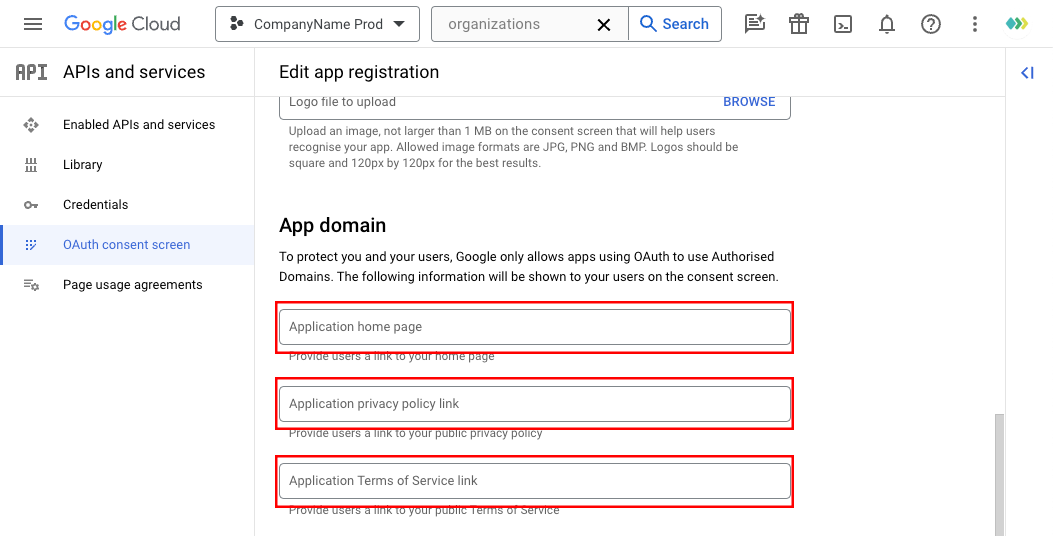
OAuth consent screen section -> App Domain
Provide the following information under the App Domain section:
- Application Homepage URL: Add the URL for your application's homepage.
Ensure that it is a true homepage and not just a 'login' page. - Application Privacy Policy Link: Include a link to your application's Privacy Policy.
Important: Ensure your legal team reviews the Privacy Policy to meet Google's specific requirements, particularly from the 'Limited Use' section of the provided document. - Application Terms of Service Link: Add a link to your application's Terms of Service.
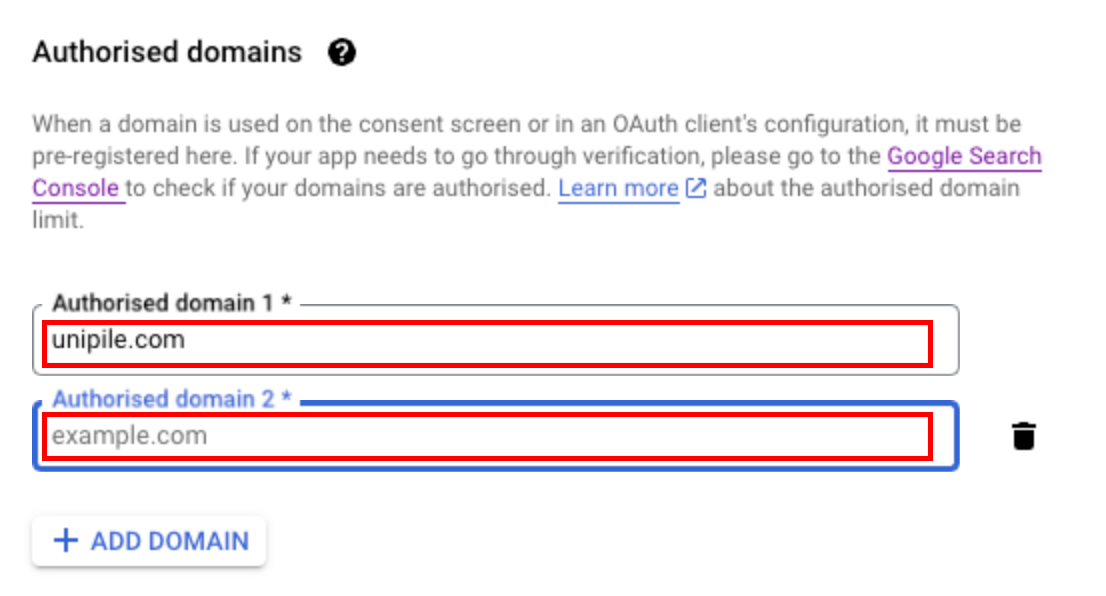
OAuth consent screen section -> Authorized Domains
Follow these steps to add authorized domains:
- Add your app domain utilized in your Google Project. Ensure your domain is the production-level one, not the dev/staging domain.
- Add unipile.com domain
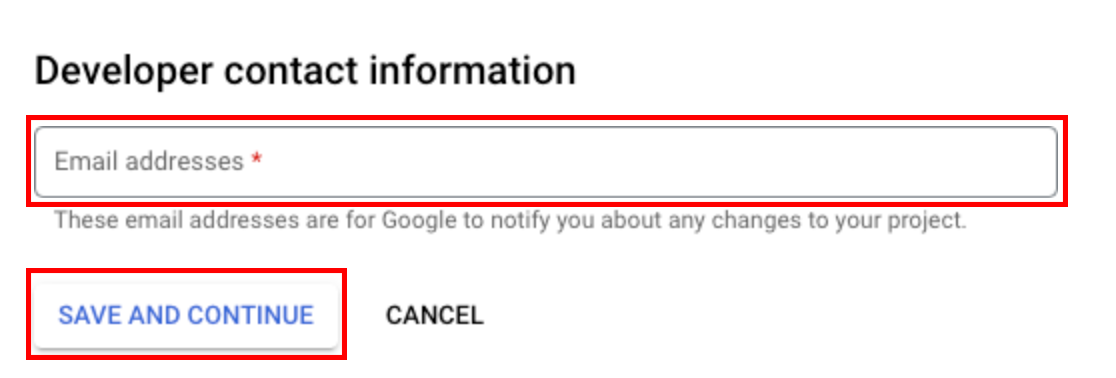
OAuth consent screen section -> Developer Contact Information
- Enter an Email Address:
- Provide an email address for developer contact information.
- Important: This should be a distribution list email address, ensuring all relevant parties receive Google Verification-related emails and notifications about any changes to your project. Keep this distribution list up-to-date as team members come and go.
- Post-Verification Monitoring:
- After submission for verification, closely monitor the Google project for any action items from Google.
- Note: Google sends emails to this address, but they may end up in spam folders or be blocked by servers. Regularly check for updates to avoid missing important communications.
Make sure to enter an actively monitored and regularly checked email address to stay informed about your Google project's status and any required actions post-verification.
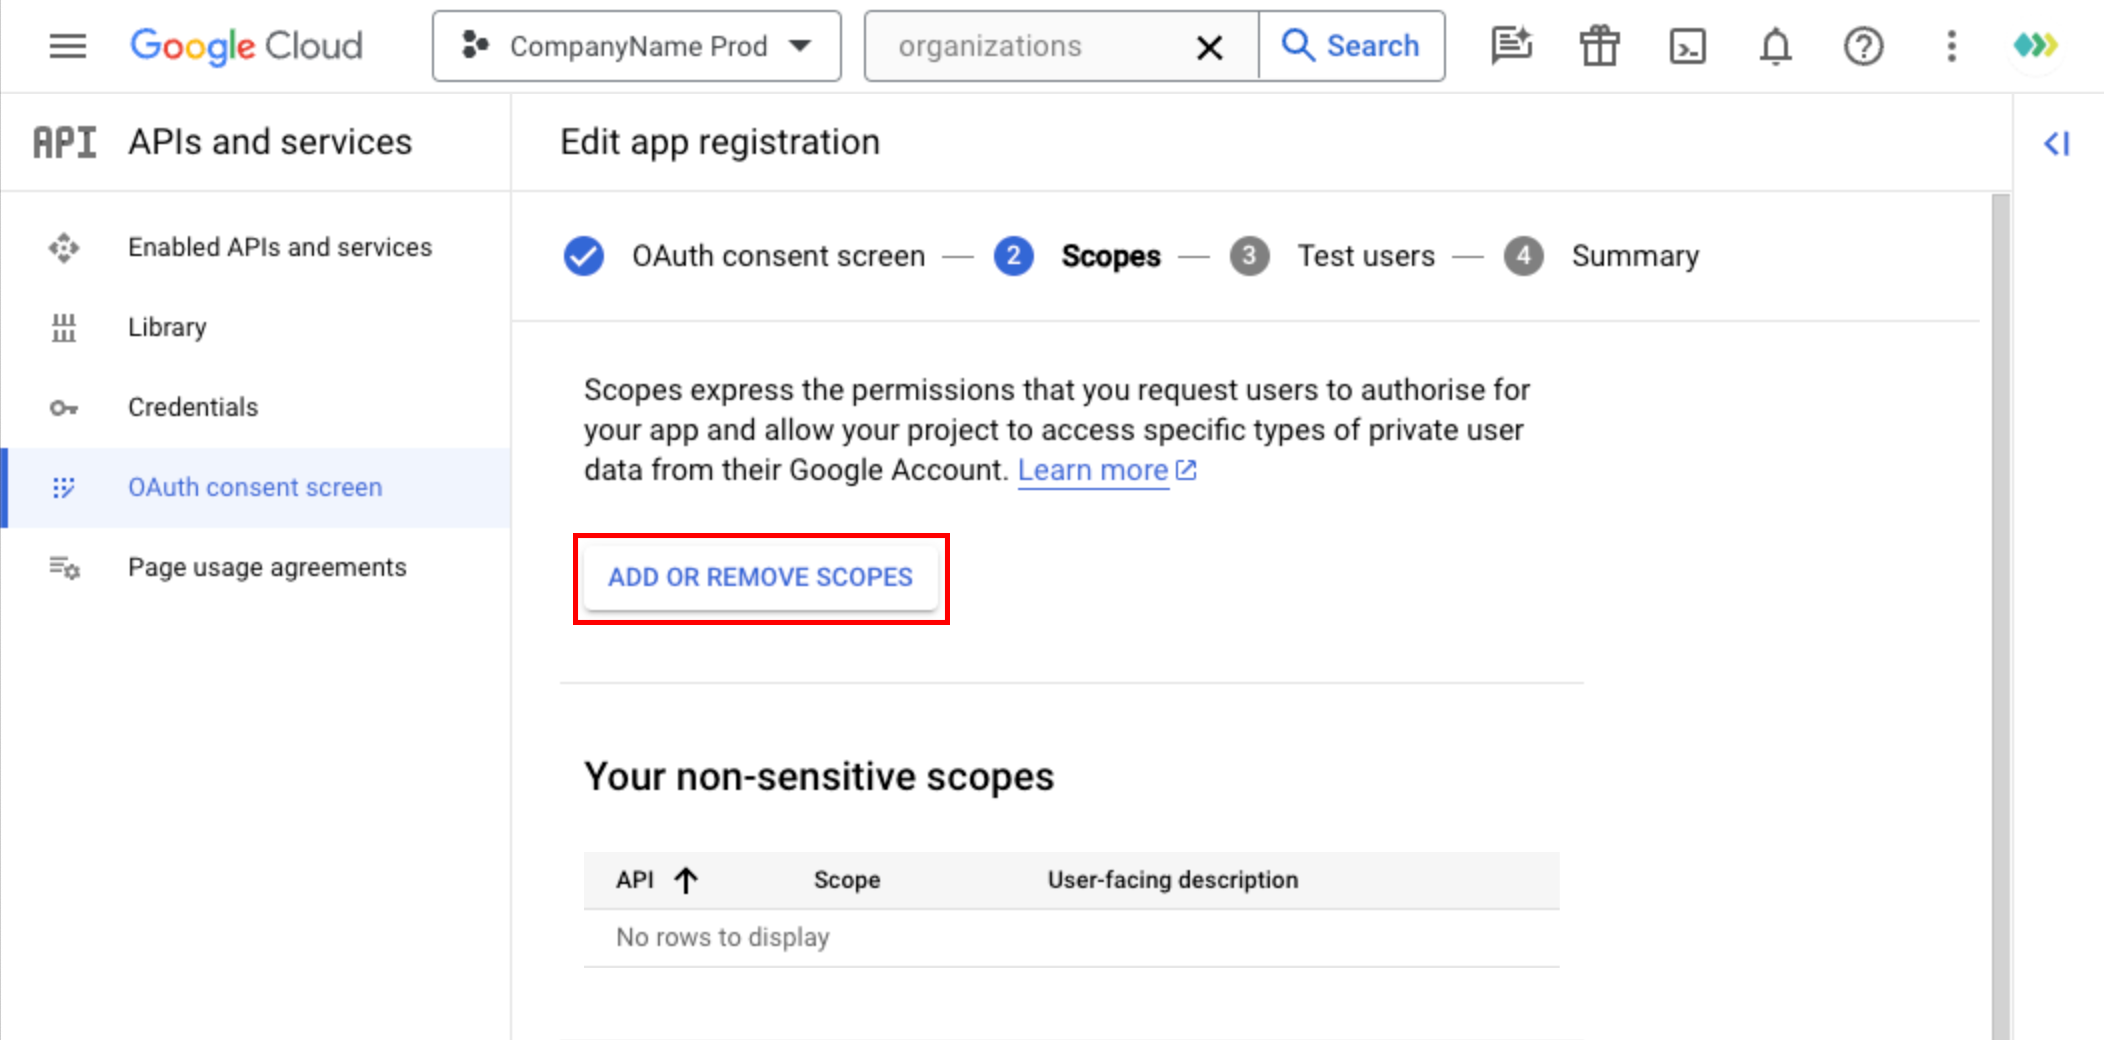
Scopes section
Follow these steps to add required scopes:
- Click on the 'ADD OR REMOVE SCOPE ' button to access the menu.
- Add the following scopes (if they don't appear in the list, refresh the page) :
./auth/gmail.send
./auth/gmail.labels
./auth/gmail.readonly
./auth/gmail.modify (not needed if you dont want move or delete email. You will have to demonstrate to Google you really use it. You need to remove it on your dashboard scopes settings too) - To use the Calendar feature, you will need the following scopes too. Do not add them unless you are integrating them, as Google will require a video demonstrating your integration:
./auth/calendar
./auth/calendar.events
You may begin your integration now and return here upon its completion.
Generate your Demonstration Video
You may proceed with this step only once your integration is fully completed and operational in production.
Produce and host a demonstration video that adheres to Google's stipulations. To validate your app with Google, you must also submit a video showcasing your app's functionality. This video should be uploaded as an 'Unlisted' YouTube video for verification purposes, and only one video link is permissible.
Before crafting the video
- Your app and OAuth flow are presented in English, as indicated in Google documentation under "Apps requesting sensitive scopes" and "Apps requesting restricted scopes."
- The demonstration is conducted in a production-level domain.
- In your Google Project settings, navigate to Navigation Menu -> APIs & Services -> OAuth Consent Screen and confirm the following:
- Publishing status is set to "In Production."
- User Type is designated as "External."
Authentication
- Display your application's homepage with the complete URL, emphasizing its production status.
- Illustrate how a Google customer can connect their account emphasizing the use of the official Google sign-in button.
- During the authentication flow, when presenting the OAuth process screen, highlight the URL and drag across to reveal the CLIENT ID in the URL.
Functionality
- Sequentially showcase each set of scopes being requested, tailoring them to your specific use case.
- Demonstrate bi-directional functionality by showing synchronization between your application and Gmail. Use separate tabs to toggle between your application and each relevant section of Gmail. For example, sending an email through your application, illustrating how changes are synced in Sent mail list on Gmail, and in the other way displaying the receipt of an incoming email within your app.
By following these guidelines, your demo video will effectively convey the authentication process and the functional capabilities of your application in sync with Google services.
After creating your video demo and ensuring it complies with all the criteria outlined, kindly share the YouTube video URL with your us. We can assist in the review process or you can proceed to submit your app for verification directly.
Please note the following steps:
- Add the final video to your Google Project as an 'unlisted' YouTube video link.
- Submit the YouTube video URL to your Customer Success Manager for review.
- Following the review, proceed with the app verification submission.
Keep in mind that the verification process duration may vary. After submission, it can take anywhere from 2 to 8 weeks, depending on Google's submission queue and the number of remediation rounds they deem necessary. Stay informed and coordinate with us throughout the verification process.
Whitelisting & Security Review for Restricted Scopes
If your application utilizes restricted scopes, additional steps are required. Here's a brief overview of what to anticipate:
Google Security Assessment
To ensure the security of user data, apps requesting access to restricted scope Google user data must undergo a security assessment. This assessment is crucial for verifying that all apps accessing Google user data can handle data securely and delete user data upon request. The detailed assessment process is outlined on the CASA (Cloud Application Security Assessment) site.
Google categorizes your app as either Tier 2 or Tier 3
- Tier 2 (Self Scanned - Lab Verified) >> Most Common
Option of Free OR paid (third-party assessor)
CASA Tier 2 Process - Tier 3 (Lab Scanned - Lab Verified)
Paid - Must be completed by a third-party assessor
After receiving your Tier classification, Google will provide instructions and tools for completing the assessment. Refer to the provided link for Google Security Assessment Information and scroll down to the Security Assessment FAQs for more detailed information. Ensure compliance with this process to demonstrate your app's capability in handling user data securely when utilizing restricted scopes.
Google Security Assessment Information
The cost is ~$500 by year for this certification.
Yearly Security Re-assessment for Apps with Restricted Scopes
Apps that access restricted scopes must undergo a yearly re-verification process for compliance and complete a security assessment every 12 months to maintain access to verified restricted scopes. This process ensures ongoing adherence to security standards and safeguards user data.
If, at any point, you introduce a new restricted scope that hasn't been previously assessed and approved, your app may require reassessment at that time.
The Google review team will initiate contact via email when it's time for your app to recertify. It is crucial to keep your Project Owner and Project Editor information up-to-date in your Cloud Console. This ensures that the right members of your team receive notifications about this annual enforcement, allowing for timely and smooth compliance with the re-assessment requirements. Stay vigilant and promptly respond to communications from Google to uphold the security and compliance of your app. Check Google FAQ for more information.
Whitelisting Option
If you prefer an alternative to the standard verification and security review processes, you have the option to have your application whitelisted. This allows you to bypass the usual procedures, but it is important to note that this option is applicable only if your application meets very specific criteria. While most use cases do not fulfill these criteria, we have outlined the requirements below for you to assess whether whitelisting might be suitable for your application.
Requirements:
- Majority of Customers using Google Workspace:
- The majority of your customers should use Google Workspace (formerly GSuite) accounts, i.e., have email addresses with the format @company.com.
- Whitelisting requires action by end users' administrators to allow access. You need to provide to your users' administrators your Google projet Client ID. They have open their Console: https://admin.google.com/ac/owl/list?tab=configuredApps and allow you client_id.
- Limited Personal Gmail Account Usage:
- Fewer than 100 personal Gmail accounts (@gmail.com addresses) should be able to authenticate into this flow.
- Unverified projects have a 100 (lifetime) user limit per project. When whitelisted, Google Workspace accounts do not count against this limit. However, personal Gmail accounts will always count towards this limit.
- Free Trial Users and Whitelisting:
- Free trial users must use their Workspace email address and whitelist the application.
Keep in mind that whitelisting is a workaround solution and might not be suitable for all use cases. Evaluate these requirements carefully to determine if your application aligns with the criteria for whitelisting. If so, take the necessary steps to meet these requirements and explore this alternative approach.
- Free trial users must use their Workspace email address and whitelist the application.
Updated 6 months ago