Hosted auth wizard
Learn how to use Hosted Auth Wizard to connect accounts on your application.
Feature available for :LinkedIn, WhatsApp, Instagram, Telegram, Google, Microsoft, IMAP, X/Twitter (no longer maintained), Facebook Messenger (no longer maintained)
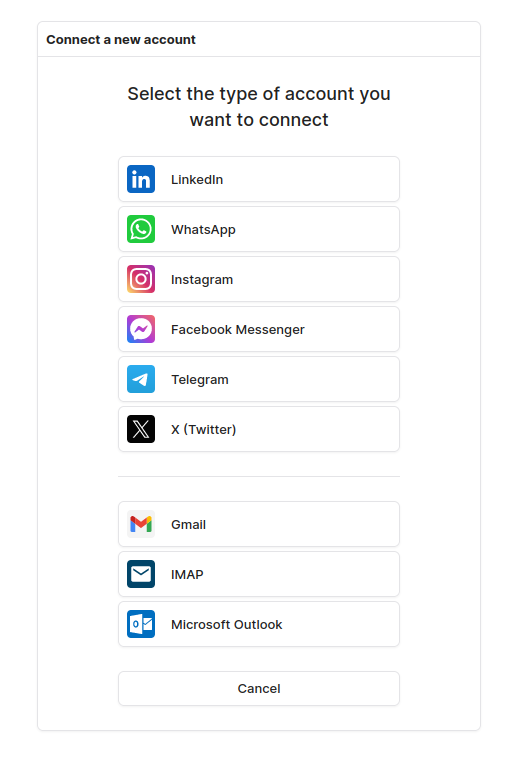
The Hosted Auth Wizard is a pre-built, optimised authentication interface that simplifies the process of connecting user accounts securely. With its built-in features, you can significantly reduce your development time and provide a streamlined authentication experience. The Hosted Auth Wizard offers support for various authentication methods, including QR code scanning, credentials-based authentication and OAuth. You can show only the providers you allow your users to connect to.
Overview

You can specify the 'name' parameter with your internal user ID when requesting a hosted auth link. We will return this parameter when we call your 'notify_url', in order to match the connected account with your user.
Quickstart
Step 1 : Generate a Hosted Auth Wizard link
To generate a hosted auth link, you'll need to make an API Request with the following parameters:
- Specifies whether you want to
createa new connection orreconnecta disconnected account. - Your Unipile API endpoint.
- The expiration date and time for the link in ISO 8601 format. Make sure it is a relatively short expiration period, ranging from a few minutes to a few hours. All links expire upon daily restart, regardless of their stated expiration date. A new link must be generated each time a user clicks on your app to connect.
- A list of messaging providers the user can choose from in the wizard. You can specify a specific provider or use "*" for all providers.
- Upon a user's successful login, you can configure two distinct URLs, one for success (
success_redirect_url) and another for failure (failure_redirect_url), to which the user will be redirected. Additionally, you have the option to receive a webhook notification containing account-related information at a URL of your choosing (notify_url). - You can specify the 'name' parameter with your internal user ID when requesting a hosted auth link. We will return this parameter when we call your 'notify_url', in order to match the connected account with your user
curl --request POST \
     --url https://apiXXX.unipile.com:XXX/api/v1/hosted/accounts/link \
     --header 'X-API-KEY: XXXXXXXX' \
     --header 'accept: application/json' \
     --header 'content-type: application/json' \
     --data '
{
  "type": "create",
  "providers": ["LINKEDIN", "WHATSAPP", "GOOGLE"],
  "api_url": "https://apiXXX.unipile.com:XXX",
  "expiresOn": "2024-12-22T12:00:00.701Z"
}
'
 // More parameters here https://developer.unipile.com/reference/hostedcontroller_requestlink
const response = await client.account.createHostedAuthLink({
type: "create",
api_url: "https://{YOUR_DSN}",
expiresOn: "2024-12-22T12:00:00.701Z",
providers: "*",
// More options here https://developer.unipile.com/reference/hostedcontroller_requestlink
})The utmost caution must be exercised to prevent the inadvertent exposure of your X-API-KEY. To accomplish this, it is necessary to establish an intermediary backend process responsible for make this api call who generate the unique link tailored to each user.
Upon a user's successful login, you can configure two distinct URLs, one for success (success_redirect_url) and another for failure (failure_redirect_url), to which the user will be redirected. Additionally, you have the option to receive a webhook notification containing account-related information at a URL of your choosing (notify_url).
Step 2 : Receive the Hosted Auth Link
Upon a successful API request, you'll receive a response containing a hosted auth URL. This URL is the link that will guide users through the authentication process.
{
  "object": "HostedAuthURL",
  "url": "https://account.unipile.com/pqb%2Gz77l.o72WXNPdqWX45jxqP5xMMlQp02zho8GAXZq0HWsAGiQ%3D"
}
Step 3: Implement the Hosted Auth Link
We strongly recommend the implementation of an automatic redirection mechanism when a user clicks a 'connect account' button within your application.
We do not recommend embedding our link in an iframe as this may cause some issues with solving the Linkedin captcha or loading the Microsoft Oauth screen..
Step 4: Receive callback when account is added
When your user successfully connects an account, you can receive a callback on a URL of your choice with the account_id and your internal ID to store the matching and make your future requests.
Add "notify_url" with your backend URL and "name" with your internal user ID parameters in your payload.
curl --request POST \
     --url https://apiXXX.unipile.com:XXX/api/v1/hosted/accounts/link \
     --header 'X-API-KEY: XXXXXXXX' \
     --header 'accept: application/json' \
     --header 'content-type: application/json' \
     --data '
{
  "type": "create",
  "providers": "*",
  "api_url": "https://apiXXX.unipile.com:XXX",
  "expiresOn": "2024-12-22T12:00:00.701Z"
  "notify_url": "https://www.yourapp.com/account_callkback?youcanauth=asthis",
  "name": "myuser1234"
}
'
const response = await client.account.createHostedAuthLink({
type: "create",
api_url: "https://{YOUR_DSN}",
expiresOn: "2024-12-22T12:00:00.701Z",
providers: "*",
notify_url: "https://www.yourhostedlink.com?youcanauth=asthis",
name: "myuser1234"
})After the user connects their account, you will receive this payload on your notify URL.
{
  "status":"CREATION_SUCCESS", // or "RECONNECTED" for reconnect type
  "account_id":"e54m8LR22bA7G5qsAc8w",
  "name":"myuser1234"
}
Reconnecting an account with Hosted Auth Wizard
The reconnection link follows a similar path as the initial connection process, but with the type parameter set to reconnect, and it necessitates the inclusion of the account ID (reconnect_account).
Example usage
- First, you need to set up a webhook to monitor account status updates. Specifically, you should look for the "CREDENTIALS" status change, which indicates that an account requires reconnection.
- Upon detecting the "CREDENTIALS" status update, send an email to the user. In this email, provide a link that will allow them to initiate the reconnection process. Ensure that the email contains clear instructions and reassures the user about the security of the process.
- When the user clicks on the reconnection link in the email, they should be directed to your backend service. This backend service generates a hosted Auth Wizard link using the Unipile API
- After generating the hosted Auth Wizard link, redirect the user to this link. The user will follow the authentication steps to reconnect their account securely.
Custom Domain URL (White-label)
You can use your own subdomain (e.g. auth.yourapp.com) to replace Unipile’s default URL.
This feature is only available for Unipile account with active subscription.
1. Configure your DNS
-
Create a CNAME record in your domain’s DNS configuration:
- Name: the subdomain you want to use (e.g.
auth) - Type:
CNAME - Target:
account.unipile.com.(final dot is optional depending on your registrar)
- Name: the subdomain you want to use (e.g.
-
Verify DNS propagation before contacting us:
- Use a tool such as whatsmydns.net or
digto check that the CNAME is correctly set up and publicly visible. - The CNAME must correctly point to
account.unipile.com, otherwise SSL certificate generation will fail.
- Use a tool such as whatsmydns.net or
Tip: DNS propagation can take up to 24 hours depending on your domain provider.
2. Validation by Unipile
Once the CNAME is active and publicly visible:
- Contact our support team and provide the full URL (e.g.
https://auth.yourapp.com). - We will finalize the configuration and generate the SSL certificate.
3. Rewrite the received link
Once Unipile support has confirmed your CNAME configuration on our side, you can replace our domain with yours in the hosted auth URL (received from your hosted auth creation link call) before redirecting your end users.
Updated 9 months ago