Create request from n8n
With n8n, you can easily integrate Unipile API requests into your workflows. A request can be made using POST or GET, depending on the endpoint and the data you want to send or retrieve. In this tutorial, we will show how to configure the HTTP Request node to call different Unipile’s endpoint and send the required parameters (account, text, and optional attachments). These requests can be used as standalone actions or integrated into more complex workflows, combined with other nodes such as databases, schedulers, or third-party services. This way, you can fully automate content publishing and other actions supported by Unipile’s API directly inside n8n.
Examples on this page
- Retreive a post
- Create a LinkedIn Post With Attachment
- Retreive profil
- Comment a post
- Start new chat
🧩Retreive a post Example
This is an example of a GET request, you must specify this type of method, and there must always be the following fields in all your GET requests:
 --header 'X-API-KEY: YOUR_API_KEY' \
 --header 'accept: application/json'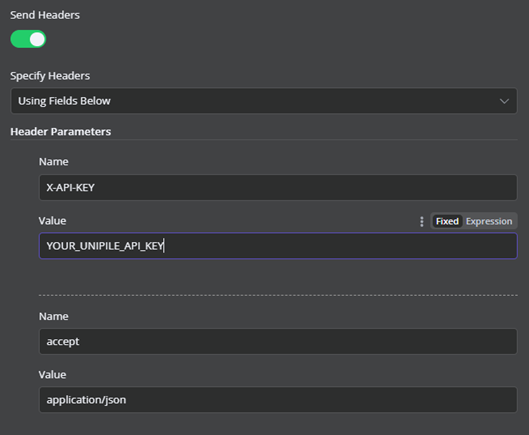
- In the empty workflow, click on “Add first step”
- Search for and select the "HTTP Request" node
- Go to the Retrieve a post endpoint page
- Fill in the fields as shown in the image below (you'll see the link between the endpoint page and the N8N fields)
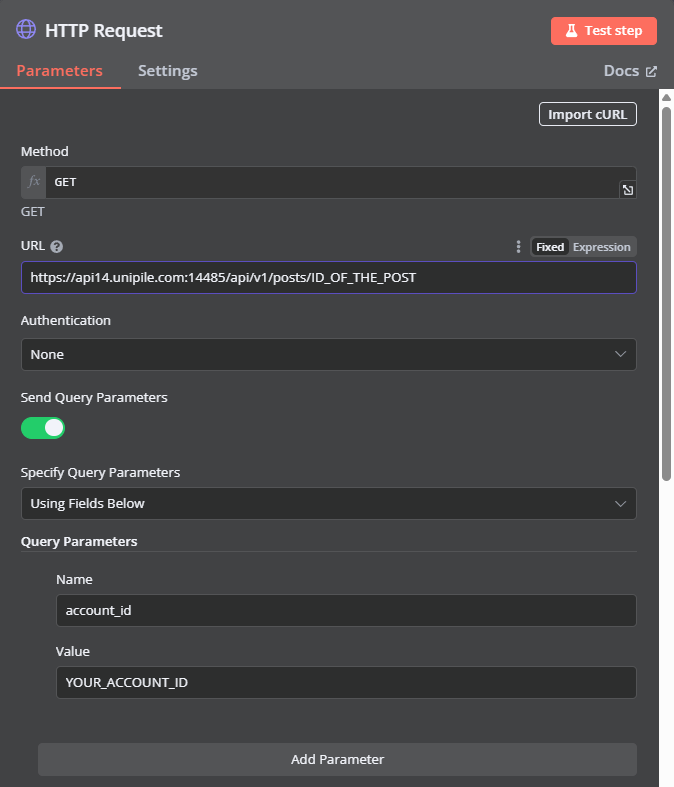
- Click on execute/test step, you should get an answer like this for a linkedin post :
[
{
"object": "Post",
"provider": "LINKEDIN",
"social_id": "urn:li:activity:7368577889719595008",
"share_url": "https://www.linkedin.com/posts/pierre-tordjman_test-activity-7368577889719595008-wAJB?utm_source=combined_share_message&utm_medium=member_desktop_web&rcm=ACoAAF4sPWcBmG5Rex3eA_bPtCwcCvjP0HWTaDg",
"date": "4h",
"parsed_datetime": "2025-09-02T10:00:41.301Z",
"comment_counter": 1,
"impressions_counter": 0,
"reaction_counter": 0,
"repost_counter": 0,
"permissions": {
"can_post_comments": true,
"can_react": true,
"can_share": true
},
"text": "TEST",
"attachments": [
{
"id": "D4E22AQE_xxPL0viCLA",
"sticker": false,
"size": {
"height": 450,
"width": 800
},
"unavailable": false,
"type": "img",
"url": "https://media.licdn.com/dms/image/v2/D4E22AQE_xxPL0viCLA/feedshare-shrink_800/B4EZkJyiSrGwAg-/0/1756805869007?e=1759968000&v=beta&t=x_anrVCZ1RLGKDTnfXxn8SyHWXfMmpdr21BoHp_IcEg"
}
],
"author": {
"public_identifier": "pierre-tordjman",
"id": "ACoAAA0VJM0BXxONVn4bcMWetDkRx46EYjg-EJU",
"name": "Pierre Tordjman ⭐",
"is_company": false,
"headline": "Développeur Web Full Stack / Intégrateur / Support"
},
"is_repost": false,
"id": "7368577889719595008"
}
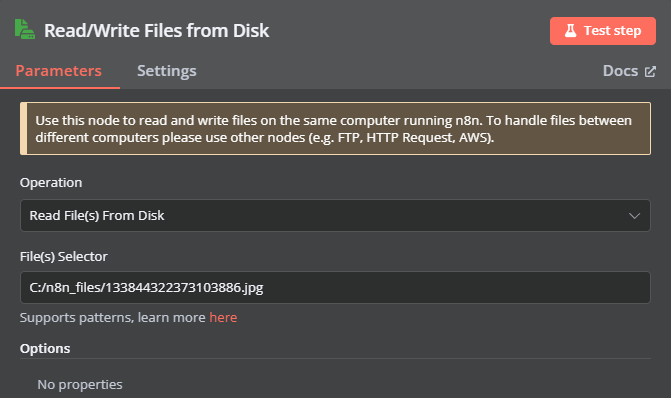
]🧩Create a LinkedIn Post With Attachment Example
This is an example of a POST request, you must specify this type of method, and there must always be the following fields in all your GET requests:
 --header 'X-API-KEY: YOUR_API_KEY' \
--header 'accept: application/json'- In the empty workflow, click on “Add first step”
- Search for "Read/Write Files from Disk" (used to import your picture and convert as interpretable data)
-
Operation field -> choose Read Files
-
Files selector field -> fill the Path_to_your_files
-
- Clic on the + connector of previous node then search for and select the "HTTP Request" node
- Go to the Create post endpoint page
- Fill in the fields as shown in the image below (you'll see the link between the endpoint page and the N8N fields)
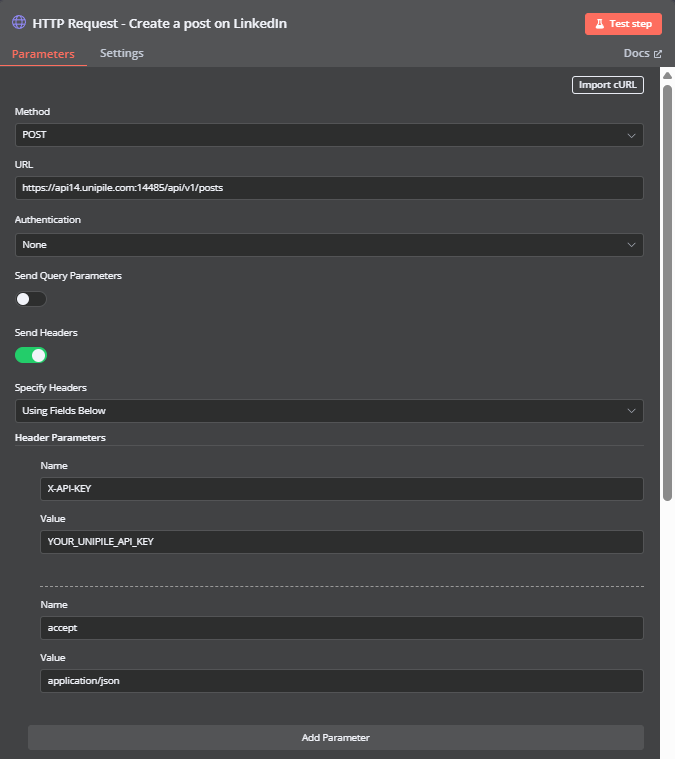
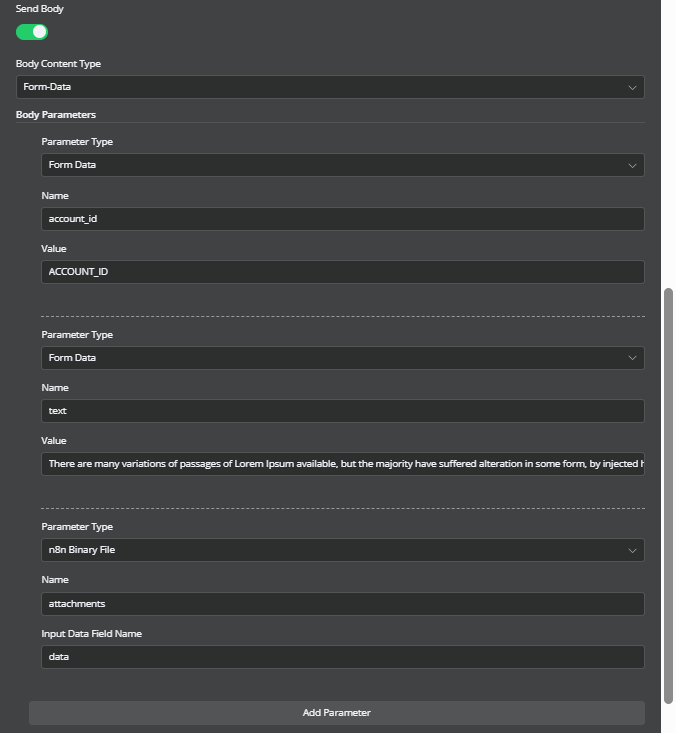
- Click on execute/test step, you should get an answer like this :
[
  {
    "object": "PostCreated",
    "post_id": "7368649927968571392"
  }
]
🧩Retrieve Profile Example
This is an example of a GET request, you must specify this type of method, and there must always be the following fields in all your GET requests:
 --header 'X-API-KEY: YOUR_API_KEY' \
--header 'accept: application/json'- In the empty workflow, click on “Add first step”
- Search for and select the "HTTP Request" node
- Go to the Retrieve Profile endpoint page
- Fill in the fields as shown in the image below (you'll see the link between the endpoint page and the N8N fields) You can also download this example here

- Click on execute/test step, you should get an answer like this for a linkedin user :
[
  {
    "object": "UserProfile",
    "provider": "LINKEDIN",
    "provider_id": "ACoAAAXxg9sBsVmolZ8Oq_7jEe92IOOpRSI8dPE",
    "public_identifier": "arnaud-hartmann",
    "member_urn": "99714011",
    "first_name": "Arnaud",
    "last_name": "Hartmann",
    "headline": "Co-founder & CTO at Unipile | One API to Enhance your App with Multi-Channel Messaging",
    "primary_locale": {
      "country": "US",
      "language": "en"
    },
    "is_open_profile": true,
    "is_premium": true,
    "is_influencer": false,
    "is_creator": true,
    "is_relationship": true,
    "network_distance": "FIRST_DEGREE",
    "is_self": false,
    "websites": [
      "http://www.unipile.com"
    ],
    "follower_count": 6296,
    "connections_count": 6145,
    "location": "Riorges, Auvergne-Rhône-Alpes, France",
    "birthdate": {
      "month": 5,
      "day": 4
    },
    "profile_picture_url": "https://media.licdn.com/dms/image/v2/D4E03AQEtIsqhaZFc8Q/profile-displayphoto-shrink_100_100/profile-displayphoto-shrink_100_100/0/1693819290815?e=1755129600&v=beta&t=KonSfCOwQeua3nhsnaJdd0ncySWA-y-RuEQ64eeFFJc",
    "profile_picture_url_large": "https://media.licdn.com/dms/image/v2/D4E03AQEtIsqhaZFc8Q/profile-displayphoto-shrink_800_800/profile-displayphoto-shrink_800_800/0/1693819290815?e=1755129600&v=beta&t=LH4MACfmW_A_yP9mFBrz2nssZMiPyPN9EhN9Ejhl5lE",
    "background_picture_url": "https://media.licdn.com/dms/image/v2/D4E16AQEmOsNC5se14A/profile-displaybackgroundimage-shrink_350_1400/B4EZaHJSXMH8Ak-/0/1746024081353?e=1755129600&v=beta&t=xLah9joKveS5uZfS0Bx91YxIJYJ2sE3qNg5hkNYKBTQ",
    "hashtags": [
      "#saas",
      "#0inbox",
      "#allistask",
      "#productivity",
      "#unifiedinbox"
    ]
  }
]
🧩Comment a post Example
This is an example of a POST request, you must specify this type of method, and there must always be the following fields in all your GET requests:
 --header 'X-API-KEY: YOUR_API_KEY' \
--header 'accept: application/json'- In the empty workflow, click on “Add first step”
- Search for and select the "HTTP Request" node
- Go to the Comment a post endpoint page
- Fill in the fields as shown in the image below (you'll see the link between the endpoint page and the N8N fields)
Note : You must integer the ID of the post in the URL (social_id), you can fill it as an expression if you get the ID in the input of the node.
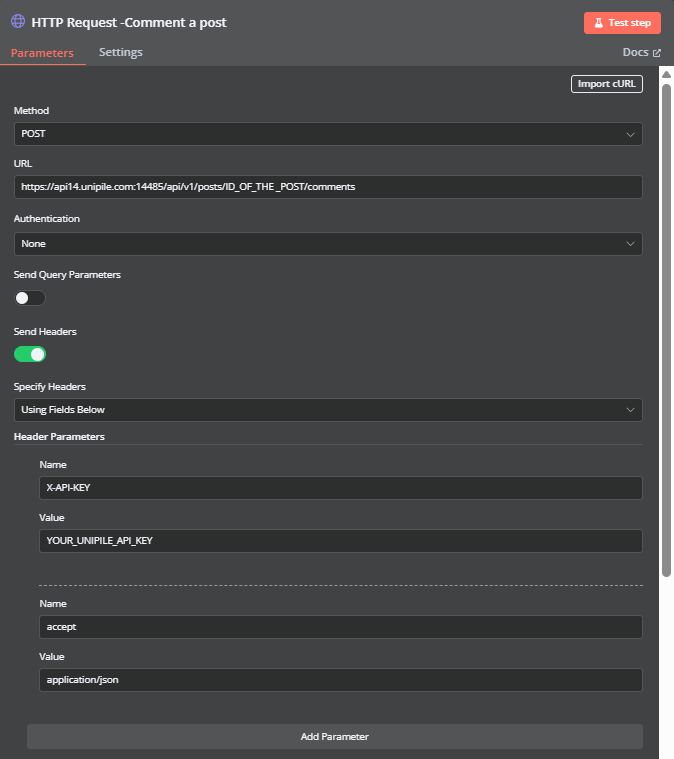

- Click on execute/test step, you should get an answer like this :
[
  {
    "object": "CommentSent"
  }
]
🧩Start New Chat Example
This is an example of a POST request, you must specify this type of method, and there must always be the following fields in all your GET requests:
 --header 'X-API-KEY: YOUR_API_KEY' \
--header 'accept: application/json'-
In the empty workflow, click on “Add first step”
-
Search for and select the "HTTP Request" node
-
Go to the Start New Chat endpoint page
-
Fill in the fields as shown in the image below (you'll see the link between the endpoint page and the N8N fields)
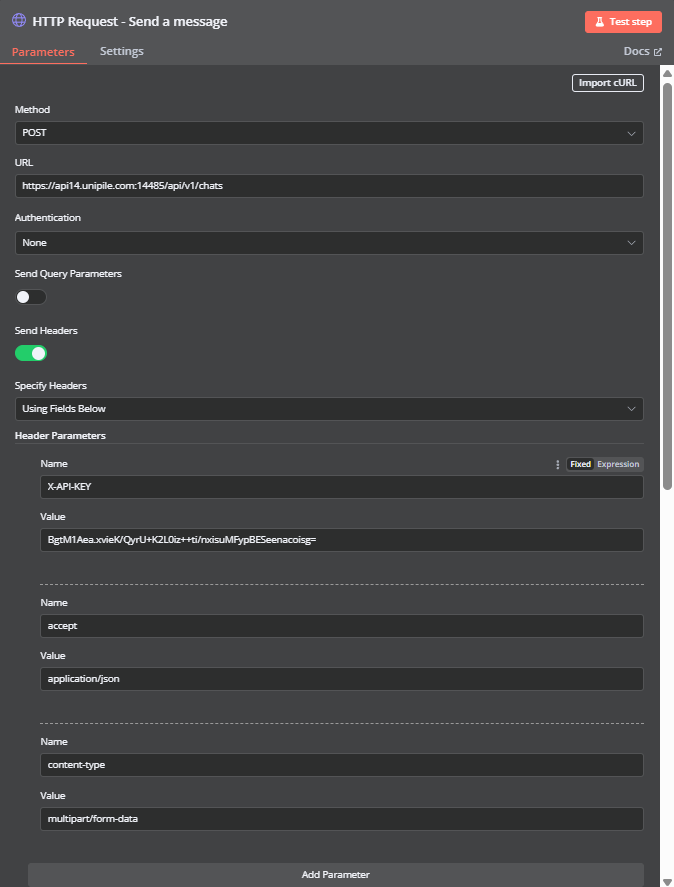
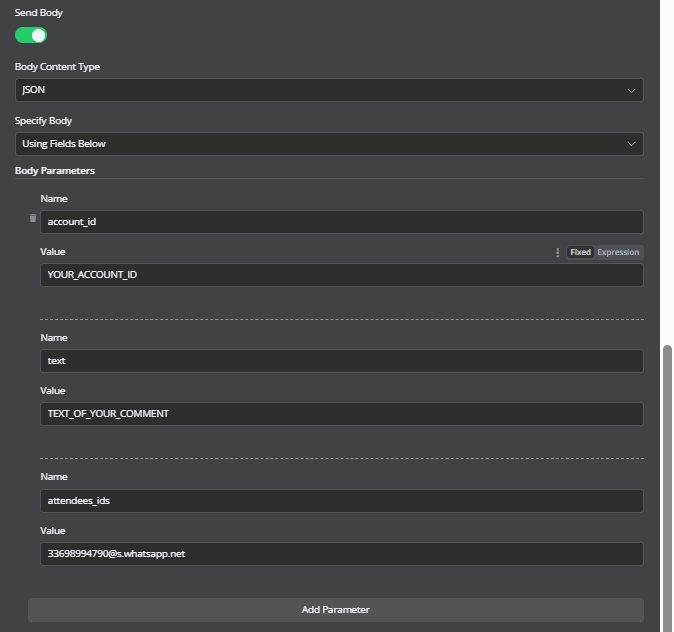
-
Click on execute/test step, you should get an answer like this :
[
  {
    "object": "ChatStarted",
    "chat_id": "dMW1cjFwXq-dYoAEaMXo2d",
    "message_id": "Gav3xjVKVNe0IRZBEC9mSg"
  }
]
Updated 7 months ago