Credentials Flow
Integrate authentication for provider that accepts a set of credentials—such as a username and password, tokens, or connection parameters. During this process, the provider may also require the user to solve additional challenges like Two-Factor Authentication (2FA), One-Time Passwords (OTP), CAPTCHAs, or in-app validations.
This flow is used by LinkedIn, IMAP, Instagram
To authenticate users using the credentials flow:
- Create a login form to collect the credentials required by the provider.
- Set up a route to handle form submissions. This route should call the Start Auth Intent endpoint, then:
- Display a success screen if the account is successfully authenticated.
- Redirect to a checkpoint screen if additional verification is required.
- Implement a route to handle checkpoint resolution using the Solve a Checkpoint endpoint, and optionally request another checkpoint using Request Checkpoint.
- Build a checkpoint screen to guide the user through the required step — such as entering a verification code, solving a CAPTCHA, or waiting for in-app validation.
To reconnect an existing account, just use the exact same flow but provide the Account ID along with the user credentials in the Start Auth Intent endpoint.
Collect credentials
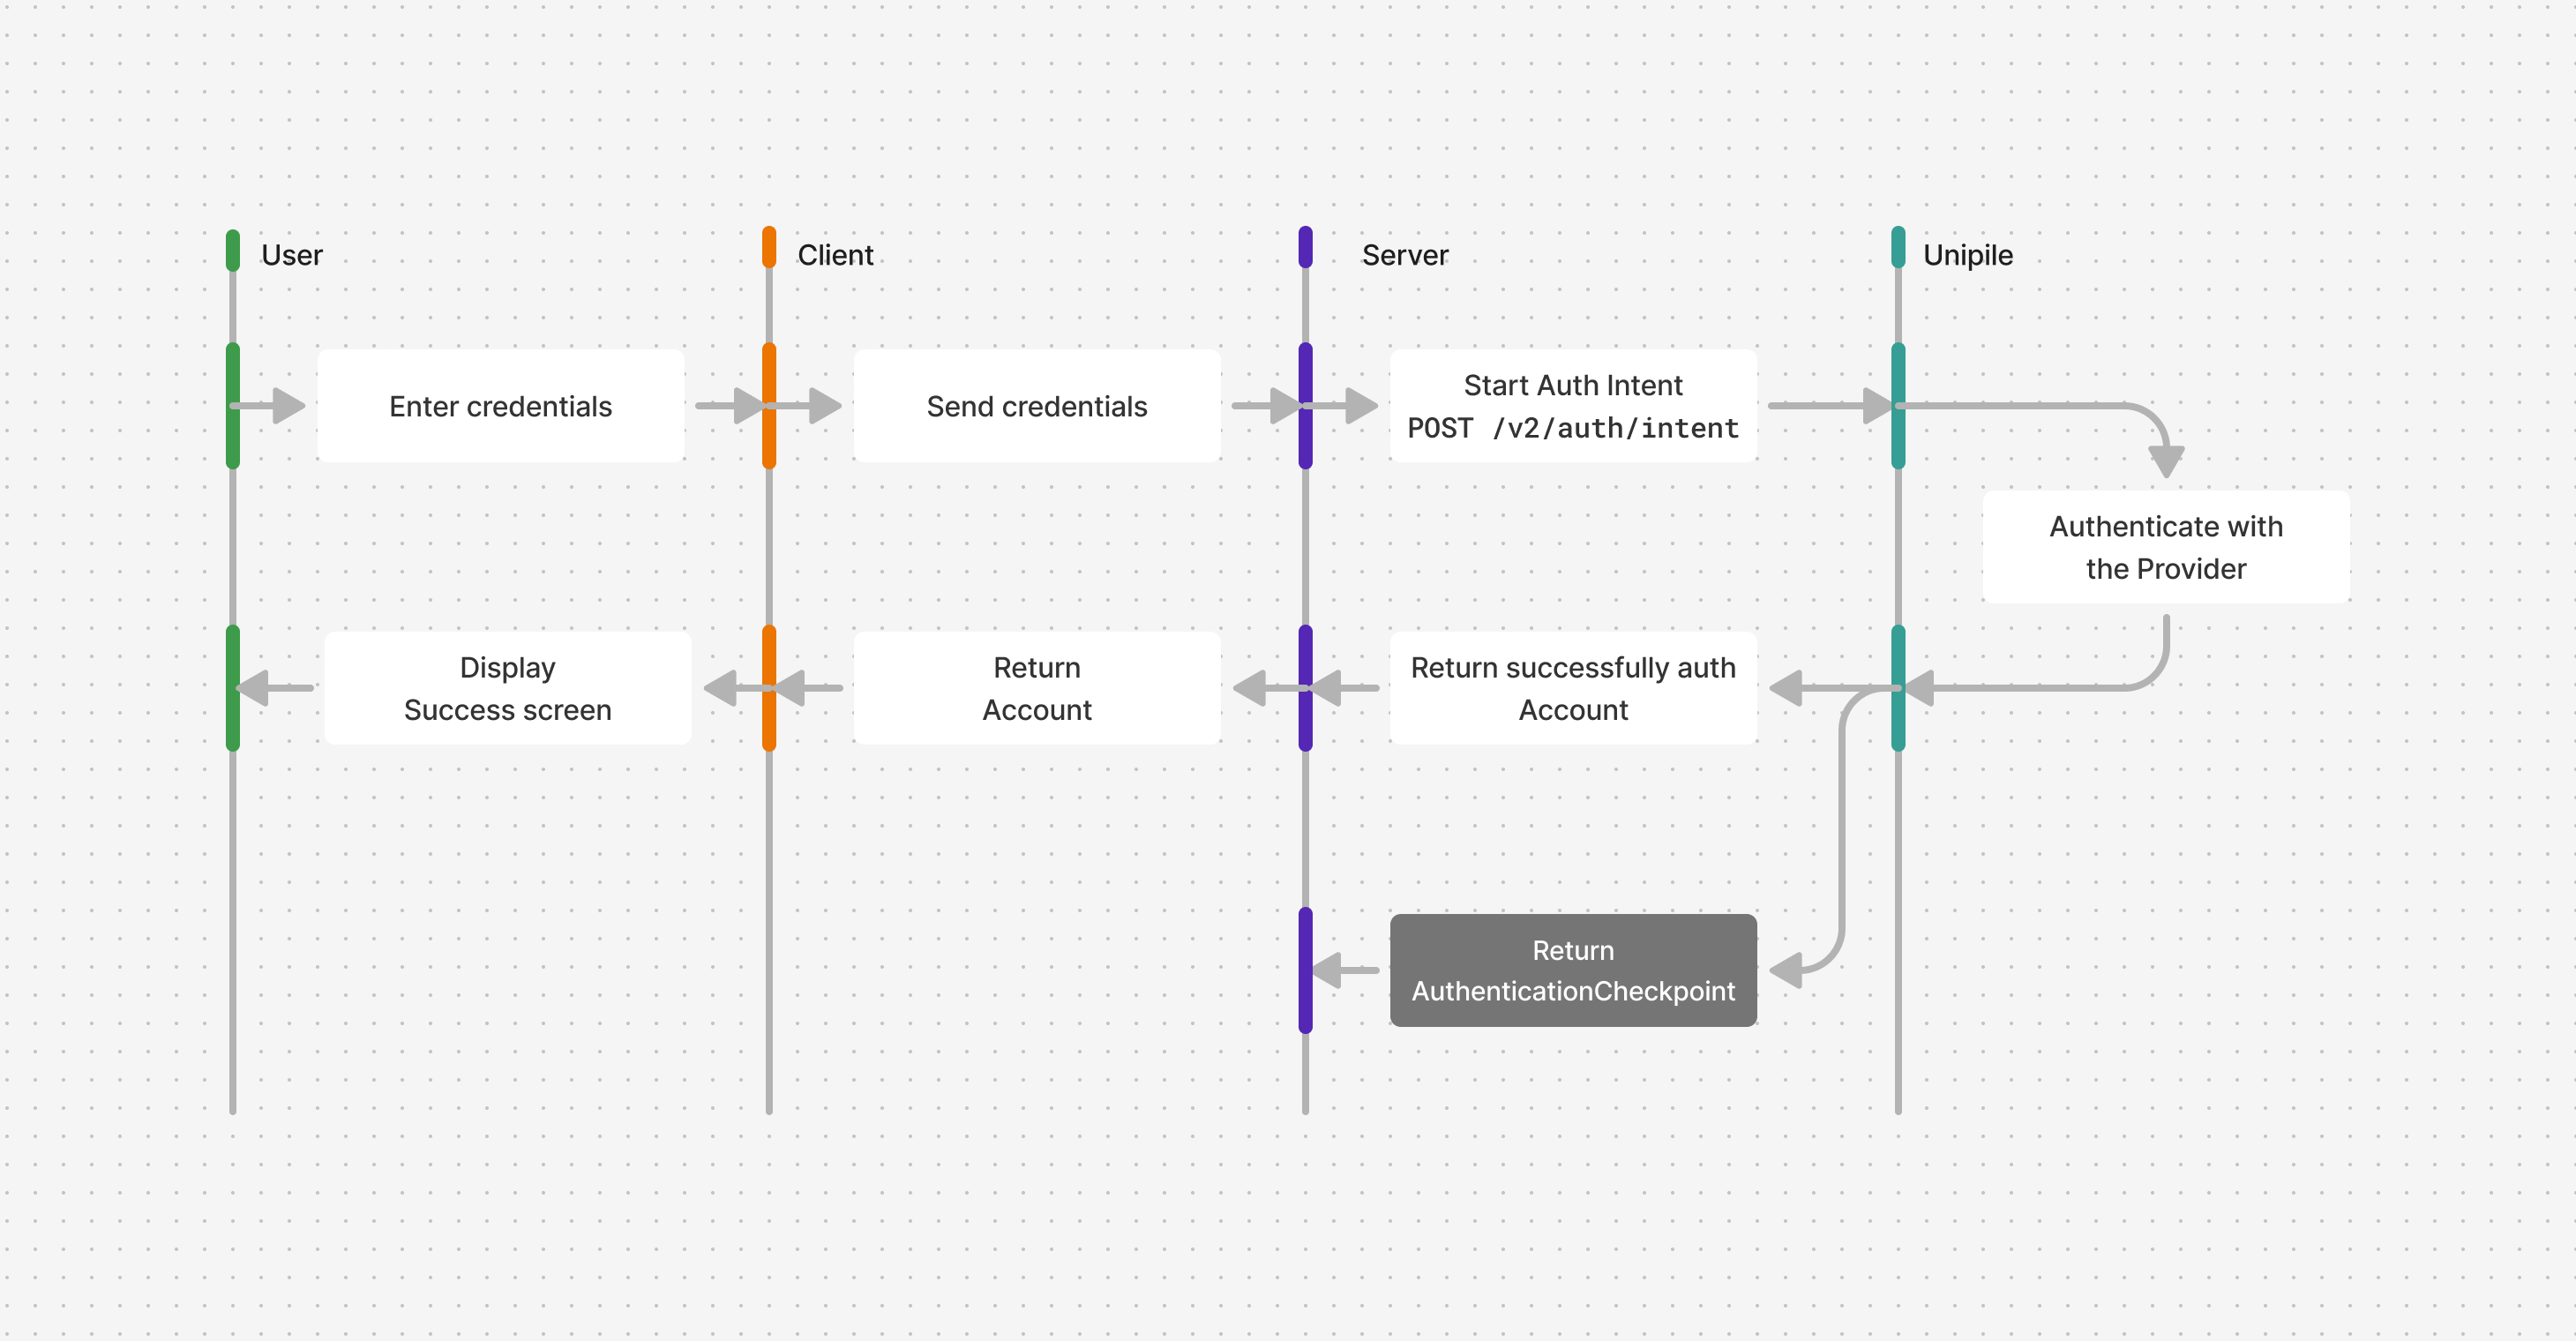
In your local application, implement a login form that collects the required credentials for the chosen provider. You can refer to the credentials field in the Start Auth Intent endpoint body to determine which inputs are necessary.
Next, create a new route in your application to handle the form submission via a POST request. This route should:
- Start Auth Intent : Forward the credentials submitted through the form to initiate the authentication process.
- Handle Successful Authentication : In the best case scenario, the authentication is successful directly, which returns an
Accountobject. Redirect the user to a confirmation screen or display a success message. - Handle Errors gracefully :
- Error responses addressed to the account owner:
provider/invalid_credentialsfor invalid credentialsprovider/unknown_authentication_contextif the process require the user to authenticate on the provider's website- For IMAP Accounts,
api/invalid_parametersif Unipile could not detect automatically the full configuration. Read Link an Email account to learn how to handle this case. - If the user has given a custom proxy, all proxy related errors, such as
api/proxy_auth_errorfor invalid proxy credentials, andapi/proxy_errororapi/proxy_timeoutif the proxy is not working properly.
- Duplicate and Restricted Accounts errors as mentioned in Accounts Linking Limitations.
- Other critical errors
- Error responses addressed to the account owner:
Server code
// index.ts

import express, { Request, Response } from "express";
import cors from "cors";
import parser from "body-parser";
import "dotenv/config";

import { UnipileCustomAuth, UnipileAccounts } from "unipile";

const key = process.env.UNIPILE_API_KEY ?? "";

const customAuthApi = new UnipileCustomAuth({ key });
const accountsApi = new UnipileAccounts({ key });

const app = express();

app.use(cors());

app.use(parser.json());
app.use(parser.urlencoded({ extended: true }));
app.use(express.json());

app.post("/auth-intent", async (req: Request, res: Response) => {
  const response = await customAuthApi.startAuthIntent({
    body: req.body,
  });

  // Handle Errors
  if (response.error) {
    res.status(response.response.status).send(response.error);
    return;
  }

  res.send(response.data);
});

app.listen(3000, () => {
  console.log("Server is running on port 3000");
});import json
import os
from typing import Any, Optional
import unipile
import uvicorn
from dotenv import load_dotenv
from fastapi import Body, FastAPI
from fastapi.middleware.cors import CORSMiddleware
from fastapi.responses import JSONResponse, PlainTextResponse, Response
from unipile.api.accounts_api import AccountsApi
from unipile.api.custom_auth_api import CustomAuthApi
from unipile.exceptions import ApiException
load_dotenv()
key = os.getenv("UNIPILE_API_KEY", "")
configuration = unipile.Configuration()
if key:
configuration.api_key["apiKey"] = key
api_client = unipile.ApiClient(configuration)
custom_auth_api = CustomAuthApi(api_client)
accounts_api = AccountsApi(api_client)
app = FastAPI()
app.add_middleware(
CORSMiddleware,
allow_origins=["*"],
allow_credentials=True,
allow_methods=["*"],
allow_headers=["*"],
)
def _to_response_data(value: Any) -> Any:
if hasattr(value, "to_dict") and callable(value.to_dict):
return value.to_dict()
return value
def _api_exception_to_body(exception: ApiException) -> Any:
if exception.data is not None:
return _to_response_data(exception.data)
if exception.body:
try:
return json.loads(exception.body)
except json.JSONDecodeError:
return exception.body
return exception.reason or "Unknown error"
def _error_response(exception: ApiException) -> Response:
status_code = exception.status or 500
body = _api_exception_to_body(exception)
if isinstance(body, (dict, list)):
return JSONResponse(status_code=status_code, content=body)
return PlainTextResponse(status_code=status_code, content=str(body))
@app.post("/auth-intent")
def auth_intent(body: Any = Body(...)) -> Response:
try:
params = custom_auth_api._start_auth_intent_serialize(
start_auth_intent_request=body,
_request_auth=None,
_content_type=None,
_headers=None,
_host_index=0,
)
response_data = custom_auth_api.api_client.call_api(*params)
response_data.read()
response = custom_auth_api.api_client.response_deserialize(
response_data=response_data,
response_types_map={"200": "SolveCheckpoint200Response"},
).data
return JSONResponse(content=_to_response_data(response))
except ApiException as exception:
return _error_response(exception)
if __name__ == "__main__":
uvicorn.run("src.main:app", host="0.0.0.0", port=4000, reload=True)
curl --request POST \
     --url https://api.unipile.com/v2/auth/intent \
     --header 'X-API-KEY: api-key' \
     --header 'accept: application/json' \
     --header 'content-type: application/json' \
     --data '
{
  "provider": "linkedin",
  "credentials": {
    "username": "username",
    "password": "password"
  }
}
'
Client code
// lib/unipile.ts

import type {
  StartAuthIntentData,
  StartAuthIntentResponse,
} from "unipile";

export async function startAuthIntent(body: StartAuthIntentData) {
  const response = await fetch("http://localhost:4000/auth-intent", {
    method: "POST",
    headers: {
      "Content-Type": "application/json",
    },
    body: JSON.stringify(body),
  });

  if (!response.ok) {
    const error = await response.text();
    throw new Error(error);
  }

  const data = await response.json();

  return data as StartAuthIntentResponse;
}

// components/LinkedIn.tsx

import type { StartAuthIntentResponse } from "unipile";
import { CredentialsFlowContainer } from "./containers/CredentialsFlowContainer";
import { startAuthIntent } from "../../lib/unipile";
import { useState } from "react";

export function LinkedInLogin({
  onSuccess,
}: {
  onSuccess: (data: StartAuthIntentResponse) => void;
}) {
  const [status, setStatus] = useState<
    "idle" | "loading" | "success" | "error"
  >("idle");

  const handleSubmit = async (e: React.FormEvent<HTMLFormElement>) => {
    e.preventDefault();
    const formData = new FormData(e.target as HTMLFormElement);
    const username = formData.get("username") as string;
    const password = formData.get("password") as string;

    setStatus("loading");

    try {
      const data = await startAuthIntent({
        provider: "linkedin",
        credentials: {
          username,
          password,
        },
      });

      setStatus("success");
      onSuccess(data);
    } catch (e) {
      console.error(e);
      setStatus("error");
    }
  };

  return (
    <div>
      <h1>Login to LinkedIn</h1>
      <form onSubmit={handleSubmit}>
        <input type="text" placeholder="Username" name="username" />
        <input type="password" placeholder="Password" name="password" />
        <button type="submit" disabled={status === "loading"}>
          {status === "loading" ? "Loading..." : "Login"}
        </button>
      </form>
      {status === "error" && <p>Error</p>}
    </div>
  );
}

export function LinkedIn() {
  return (
    <CredentialsFlowContainer>
      {(handleSuccess) => <LinkedInLogin onSuccess={handleSuccess} />}
    </CredentialsFlowContainer>
  );
}


// components/containers/CredentialsFlowContainer.tsx

import { useState } from "react";
import type {
  GetAccountResponse,
  StartAuthIntentResponse,
} from "unipile";
import { LinkedInLogin } from "./logins/LinkedInLogin";

export function CredentialsFlowContainer({ children }: {
  children: (
    handleSuccess: (data: StartAuthIntentResponse) => void
  ) => React.ReactNode;
}) {
  const [account, setAccount] = useState<GetAccountResponse>();

  const handleSuccess = (data: StartAuthIntentResponse) => {
    if (data.object === "Account") setAccount(data);
  };

  if (account) {
    return (
      <h1>
        Account {account.name || account.id} is successfully authenticated
      </h1>
    );
  }

  return children(handleSuccess);
}

// App.tsx

import { LinkedIn } from "./components/LinkedIn";

export function App() {
  return <LinkedIn />
}
Redirect to a Checkpoint screen
After initiating an Auth Intent, an AuthenticationCheckpoint may be returned. Some checkpoints require user input or an action; others continue automatically in the background. Different providers may require different types of verification, which your application must support :
- Two-Factor Authentication (
2FA) : If the account is protected by 2FA, the user will be prompted to enter a code from their authentication app (e.g., Google Authenticator) or SMS. - One Time Password (
OTP) : To verify the user’s identity, a code may be sent to their registered email address or phone number. The user must enter this code to proceed. - Phone registration (
PHONE_REGISTER) : If no phone number is registered with the provider, the user will first be asked to enter a valid phone number. Once submitted, a follow-up checkpoint will prompt them to enter a verification code sent to that number. - Captcha (
CAPTCHA) : To ensure the user is human, the provider may require solving a CAPTCHA. Your application should display the CAPTCHA challenge for the user to complete. - In App Validation (
IN_APP_VALIDATION) : Some providers use their own mobile apps to verify the user’s identity. In this case, the user will need to confirm the login request by interacting with the provider’s app. Your application must wait for this validation to complete. - OTP or In-App Validation (
OTP_OR_IN_APP_VALIDATION) : Based on the provider security settings, the user can verify its identity using One Time Password or In App Validation. Your application must show an input for an OTP code while waiting for an in app validation. - Loading (
LOADING) : Authentication is continuing in the background and requires no user input. Display a loading screen, then immediately call Solve Checkpoint with an emptycodeand wait for its response. At present, this checkpoint is used by WhatsApp.
No Checkpoint ProvidersThe following providers do not return checkpoints:
- IMAP
If you only plan to link accounts from those providers using the Credentials Flow, you can stop the tutorial here.
The given AuthenticationCheckpoint object contains useful metadata that will help you adapt the UI and that must be forwarded to solve the checkpoint later on:
intent_idis required to be used in the Solve a Checkpoint request later.checkpoint.typeandcheckpoint.platformcan be used to display a contextual title / description to indicate what code is expected and where it can be found, or what action is required from the user.- For
CAPTCHAcheckpoint,checkpoint.public_keyandcheckpoint.dataare required to display the Captcha client side.
Update your client code to handle a checkpoint response.
Client code
// components/containers/CredentialsFlowContainer.tsx

// ...
import type {
  SolveCheckpointResponse,
  StartAuthIntentResponse,
  GetAccountResponse,
} from "unipile";
import { CodeInputCheckpoint } from "../checkpoints/CodeInputCheckpoint";
import { CaptchaCheckpoint } from "../checkpoints/CaptchaCheckpoint";
import { WaitingCheckpoint } from "../checkpoints/WaitingCheckpoint";

type AuthenticationCheckpoint = SolveCheckpointResponse & {
  object: "AuthenticationCheckpoint";
};


type AuthenticationCheckpoint = SolveCheckpointResponse & {
  object: "AuthenticationCheckpoint";
};

export function CredentialsFlowContainer({ provider }: { provider: string }) {
  const [checkpoint, setCheckpoint] = useState<AuthenticationCheckpoint>();
  const [account, setAccount] = useState<GetAccountResponse>();

  const handleSuccess = (data: StartAuthIntentResponse) => {
    if (data.object === "AuthenticationCheckpoint") setCheckpoint(data);
    if (data.object === "Account") setAccount(data);
  };

  if (checkpoint) {
    const { type } = checkpoint.checkpoint;

    if (type === "2FA") {
      return (
        <CodeInputCheckpoint
          title={"Two-Factor Authentication (" + checkpoint.checkpoint.platform + ")"}
          placeholder="Code"
          intent_id={checkpoint.intent_id}
          onSuccess={handleSuccess}
        />
      );
    }

    if (type === "OTP") {
      return (
        <CodeInputCheckpoint
          title="A One-Time Password has been sent to your email"
          placeholder="Code"
          intent_id={checkpoint.intent_id}
          onSuccess={handleSuccess}
        />
      );
    }

    if (type === "PHONE_REGISTER") {
      return (
        <CodeInputCheckpoint
          title="Please provide your phone number"
          placeholder="Phone Number"
          intent_id={checkpoint.intent_id}
          onSuccess={handleSuccess}
        />
      );
    }

    if (type === "CAPTCHA") {
      return (
        <CaptchaCheckpoint
          intent_id={checkpoint.intent_id}
          data={checkpoint.checkpoint.data || ""}
          public_key={checkpoint.checkpoint.public_key || ""}
          onSuccess={handleSuccess}
        />
      );
    }

    if (type === "IN_APP_VALIDATION") {
      return (
        <WaitingCheckpoint
          title="Validate your identity from the provider's app"
          intent_id={checkpoint.intent_id}
          onSuccess={handleSuccess}
        />
      );
    }

    if (type === "LOADING") {
      return (
        <WaitingCheckpoint
          title="Completing authentication"
          intent_id={checkpoint.intent_id}
          onSuccess={handleSuccess}
        />
      );
    }
  }

//...

}
Request another checkpoint
If the current checkpoint cannot be completed—for example, the user cannot access the selected verification method—use Request Checkpoint to ask the provider for another checkpoint for the same authentication intent.
This is particularly useful for an OTP_OR_IN_APP_VALIDATION checkpoint. Keep the intent_id from the current AuthenticationCheckpoint, call this endpoint, then render the returned checkpoint exactly as you would a checkpoint returned by Start Auth Intent. The response can also contain a QR code.
Server code
// index.ts

// ...

app.post("/request-checkpoint", async (req: Request, res: Response) => {
  const response = await customAuthApi.requestCheckpoint({
    body: { intent_id: req.body.intent_id },
  });

  if (response.error) {
    res.status(response.response.status).send(response.error);
    return;
  }

  res.send(response.data);
});

// ...# main.py
# ...
@app.post("/request-checkpoint")
def request_checkpoint(body: Any = Body(...)) -> Response:
try:
params = custom_auth_api._request_checkpoint_serialize(
request_checkpoint_request={"intent_id": body["intent_id"]},
_request_auth=None,
_content_type=None,
_headers=None,
_host_index=0,
)
response_data = custom_auth_api.api_client.call_api(*params)
response_data.read()
response = custom_auth_api.api_client.response_deserialize(
response_data=response_data,
response_types_map={"200": "RequestCheckpoint200Response"},
).data
return JSONResponse(content=_to_response_data(response))
except ApiException as exception:
return _error_response(exception)
# ...curl --request POST \
--url https://api.unipile.com/v2/auth/checkpoint/request \
--header 'X-API-KEY: api-key' \
--header 'accept: application/json' \
--header 'content-type: application/json' \
--data '
{
"intent_id": "acc_123456789"
}
'On the client, forward the returned response to the same handler used for Start Auth Intent. Do not create a new authentication intent: the existing intent_id preserves the current authentication flow.
Handle checkpoint solving
Before implementing the client code, create a POST route in your application to handle various forms of checkpoint solving.
This route should:
- Solve a Checkpoint: Forward the
codethat could be submitted by code-based checkpoints with theintent_idprovided in theAuthenticationCheckpointobject. - Handle Success or Further Checkpoints : Treat the response exactly as you would in the previous steps: either complete the login flow or handle additional chained checkpoints.
- Handle Errors gracefully the same way as in the first step of this guide (Collect credentials).
Server code
// index.ts

// ...

app.post("/solve-checkpoint", async (req: Request, res: Response) => {
  const response = await customAuthApi.solveCheckpoint({
    body: req.body,
  });

  // Handle Errors
  if (response.error) {
    res.status(response.response.status).send(response.error);
    return;
  }

  // Return the Account or AuthenticationCheckpoint
  res.send(response.data);
});

//...curl --request POST \
--url https://api.unipile.com/v2/auth/checkpoint \
--header 'X-API-KEY: api-key' \
--header 'accept: application/json' \
--header 'content-type: application/json' \
--data '
{
"code": "123",
"intent_id": "acc_123456789"
}
'# main.py
# ...
@app.post("/solve-checkpoint")
def solve_checkpoint(body: Any = Body(...)) -> Response:
try:
params = custom_auth_api._solve_checkpoint_serialize(
solve_checkpoint_request=body,
_request_auth=None,
_content_type=None,
_headers=None,
_host_index=0,
)
response_data = custom_auth_api.api_client.call_api(*params)
response_data.read()
response = custom_auth_api.api_client.response_deserialize(
response_data=response_data,
response_types_map={"200": "SolveCheckpoint200Response"},
).data
return JSONResponse(content=_to_response_data(response))
except ApiException as exception:
return _error_response(exception)
# ...
Client code
// lib/unipile.ts

import type { SolveCheckpointData, SolveCheckpointResponse } from "unipile";

//...

export async function solveCheckpoint(body: SolveCheckpointData) {
  const response = await fetch("http://localhost:4000/solve-checkpoint", {
    method: "POST",
    headers: {
      "Content-Type": "application/json",
    },
    body: JSON.stringify(body),
  });

  if (!response.ok) {
    const error = await response.text();
    throw new Error(error);
  }

  const data = await response.json();

  return data as SolveCheckpointResponse;
}
Present code-based checkpoints
Some checkpoints only require a code to be solved. This code is either:
- Manually entered by the user (in the case of Two-Factor Authentication, One-Time Passwords, or Phone Registration — where the “code” is a phone number),
- Or generated as a result of solving a CAPTCHA.
Once collected, this code must be forwarded to the Solve a Checkpoint endpoint using the previously created route.
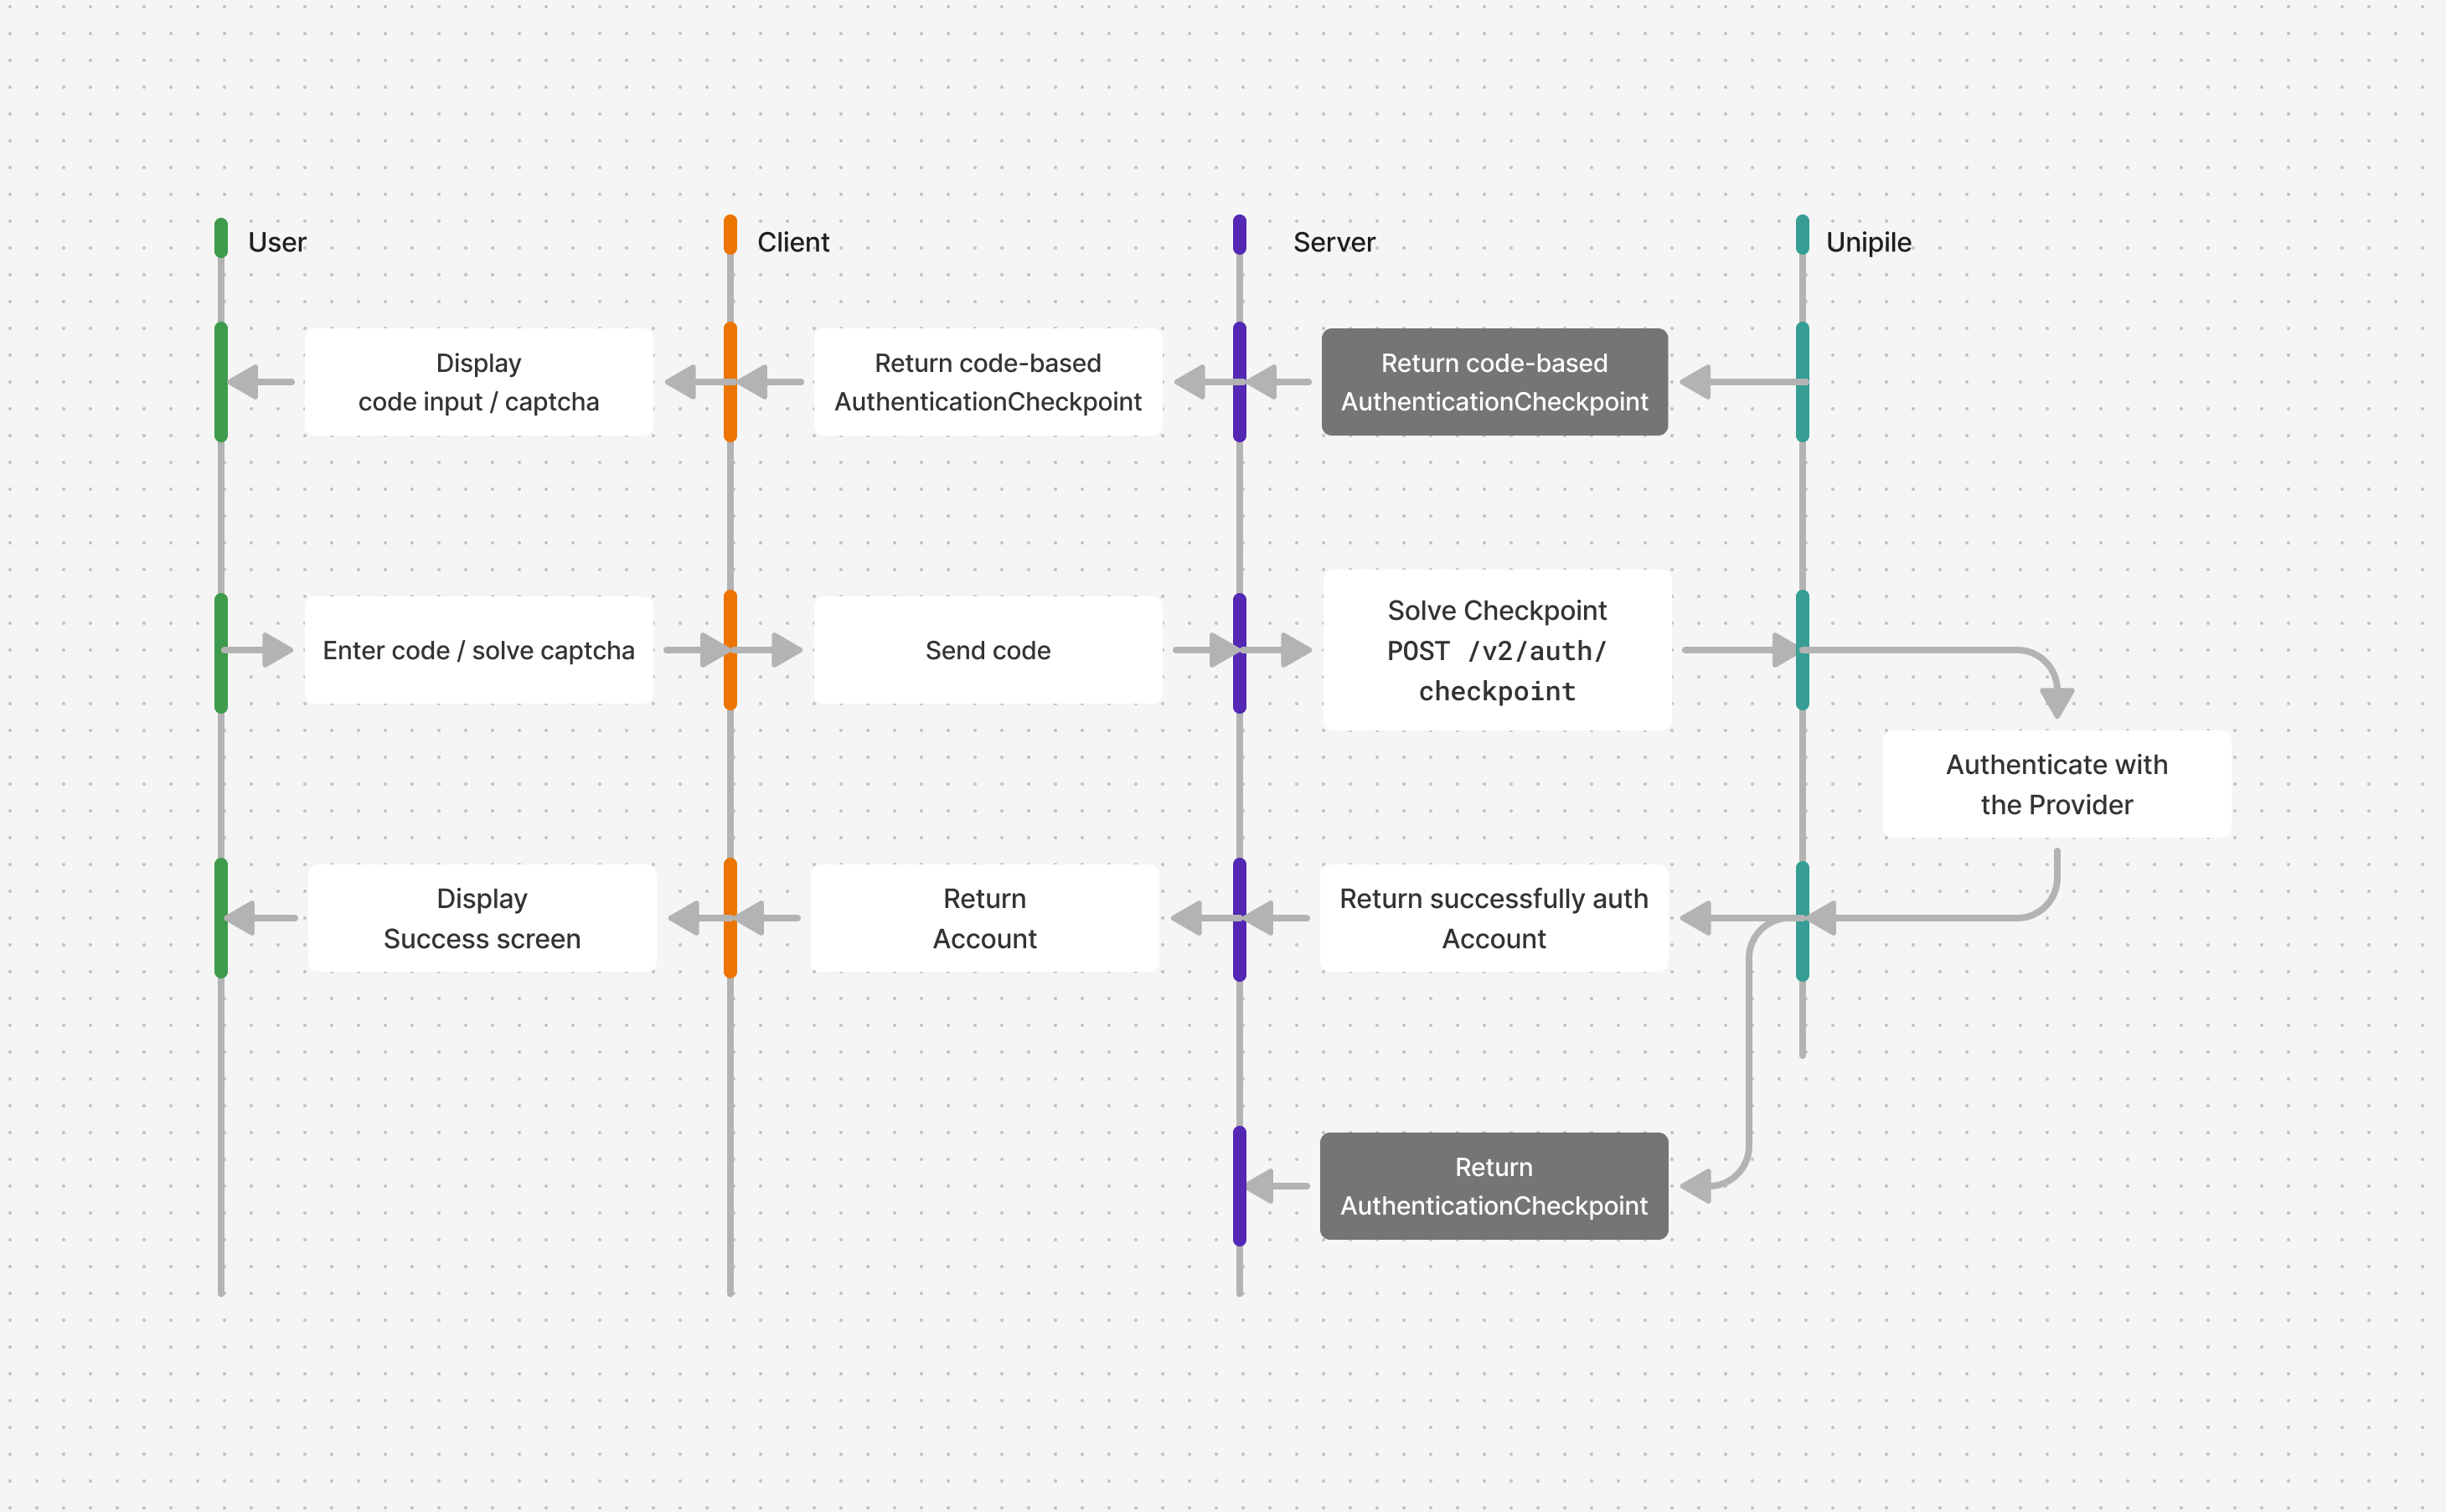
Display code input
For checkpoints of type 2FA, OTP, or PHONE_REGISTER, implement a form with an input field to collect the required code / phone number. The checkpoint.type and checkpoint.platform can be used to display a contextual title / description to indicate what code is expected and where it can be found.
On submit of the form, make a POST request to the previously created route.
Client code
// components/checkpoints/CodeInputCheckpoint.tsx

import type { SolveCheckpointResponse } from "unipile";
import { solveCheckpoint } from "../../lib/unipile";

export function CodeInputCheckpoint({
  title,
  placeholder,
  intent_id,
  onSuccess,
}: {
  title: string;
  placeholder: string;
  intent_id: string;
  onSuccess: (data: SolveCheckpointResponse) => void;
}) {
  const handleSubmit = async (e: React.FormEvent<HTMLFormElement>) => {
    e.preventDefault();
    const formData = new FormData(e.target as HTMLFormElement);
    const code = formData.get("code") as string;

    const data = await solveCheckpoint({
      intent_id,
      code,
    });

    onSuccess(data);
  };

  return (
    <div>
      <h1>{title}</h1>
      <form onSubmit={handleSubmit}>
        <input type="text" placeholder={placeholder} name="code" />
        <button type="submit">Submit</button>
      </form>
    </div>
  );
}
Display captcha
For CAPTCHA checkpoints, display the Captcha challenge using the public_key and data provided in the AuthenticationCheckpoint object.
We recommend using the Arkoselabs Client API to render the Captcha and handle the resolution callback.
On resolution, the retrieved code must be forwarded to the Solve a Checkpoint endpoint using the previously created route.
Client code
// components/checkpoints/CaptchaCheckpoint.tsx

import { useEffect } from "react";
import type { SolveCheckpointResponse } from "unipile";
import { solveCheckpoint } from "../../lib/unipile";

export function CaptchaCheckpoint({
  intent_id,
  data,
  public_key,
  onSuccess,
}: {
  intent_id: string;
  data: string;
  public_key: string;
  onSuccess: (data: SolveCheckpointResponse) => void;
}) {
  const handleResolution = async (token: string) => {
    console.log(token);
    const data = await solveCheckpoint({
      intent_id,
      code: token,
    });

    onSuccess(data);
  };

  return (
    <ArkoseLabsCaptcha
      data={data}
      public_key={public_key}
      onSuccess={handleResolution}
      onError={console.error}
    />
  );
}

type Props = {
  data: string;
  public_key: string;
  onSuccess: (token: string) => void;
  onError: (error: Error | null) => void;
};

export function ArkoseLabsCaptcha({
  onError,
  onSuccess,
  data,
  public_key,
}: Props) {
  useEffect(() => {
    const arkoseMessageHandler = (e: MessageEvent<unknown>) => {
      if (typeof e.data === "string") {
        const eventData = JSON.parse(e.data);
        if (isChallengeEvent(eventData)) {
          switch (eventData.eventId) {
            case "challenge-loaded":
              onError(null);
              break;
            case "challenge-complete":
              onSuccess(eventData.payload.sessionToken);
              window.removeEventListener("message", arkoseMessageHandler);
              break;
            case "challenge-error":
            case "challenge-failed":
              onError(new Error("Captcha resolution failed. Please retry."));
              break;
          }
        }
      }
    };
    window.addEventListener("message", arkoseMessageHandler);

    // Inject Arkose Labs enforcement script
    const setupEnforcementScript = document.createElement("script");
    setupEnforcementScript.textContent = makeEnforcementScript({
      targetElementId: "arkose",
      publicKey: public_key,
      data,
      startTime: Date.now(),
    });
    document.head.appendChild(setupEnforcementScript);

    // Load Arkose Labs game script
    const apiScript = document.createElement("script");
    apiScript.src = `//client-api.arkoselabs.com/v2/${public_key}/api.js`;
    apiScript.dataset["callback"] = "setupEnforcement";
    apiScript.defer = true;
    apiScript.async = true;
    document.head.appendChild(apiScript);

    return () => {
      window.removeEventListener("message", arkoseMessageHandler);
      setupEnforcementScript.remove();
      apiScript.remove();
    };
  }, []);

  return <div id="arkose"></div>;
}

type ArkoseChallengeEvent =
  | {
      eventId:
        | "challenge-loaded"
        | "challenge-complete"
        | "challenge-failed"
        | "challenge-shown"
        | "challenge-error";
      publicKey: string;
      payload: {
        sessionToken: string;
      };
    }
  | {
      eventId: "challenge-iframeSize";
      publicKey: string;
      payload: {
        frameHeight: number;
        frameWidth: number;
      };
    };

const isChallengeEvent = (data: unknown): data is ArkoseChallengeEvent => {
  return !!data && typeof data === "object" && "eventId" in data;
};

type MakeEnforcementScriptProps = {
  publicKey: string;
  targetElementId: string;
  data: string;
  startTime: number;
};

const makeEnforcementScript = ({
  data,
  publicKey,
  startTime,
  targetElementId,
}: MakeEnforcementScriptProps) => {
  return `
  function setupEnforcement(e) {
      const endTime = Date.now();

      e.setConfig({
        selector: "#${targetElementId}",
        styleTheme: undefined,
        language: "en",
        data: { blob: "${data}" },
        mode: "inline",
        noSuppress: undefined,
        apiLoadTime: { start: ${startTime}, end: endTime, diff: endTime - ${startTime} },
        onCompleted: function (e) {
          parent.postMessage(
            JSON.stringify({ eventId: "challenge-complete", publicKey: "${publicKey}", payload: { sessionToken: e.token } }),
            "*"
          );
        },
        onReady: function (e) {
          parent.postMessage(
            JSON.stringify({ eventId: "challenge-loaded", publicKey: "${publicKey}", payload: { sessionToken: e.token } }),
            "*"
          );
        },
        onSuppress: function (e) {
          parent.postMessage(
            JSON.stringify({ eventId: "challenge-suppressed", publicKey: "${publicKey}", payload: { sessionToken: e.token } }),
            "*"
          );
        },
        onShown: function (e) {
          parent.postMessage(
            JSON.stringify({ eventId: "challenge-shown", publicKey: "${publicKey}", payload: { sessionToken: e.token } }),
            "*"
          );
        },
        onError: function (e) {
          parent.postMessage(
            JSON.stringify({ eventId: "challenge-error", publicKey: "${publicKey}", payload: { error: e.error } }),
            "*"
          );
        },
        onWarning: function (e) {
          parent.postMessage(
            JSON.stringify({ eventId: "challenge-warning", publicKey: "${publicKey}", payload: { warning: e.warning } }),
            "*"
          );
        },
        onFailed: function (e) {
          parent.postMessage(
            JSON.stringify({ eventId: "challenge-failed", publicKey: "${publicKey}", payload: { sessionToken: e.token } }),
            "*"
          );
        },
        onResize: function (e) {
          var n = e && e.height ? e.height : 450,
            a = e && e.width ? e.width : 400;
          try {
            "string" == typeof n && ((n = n.replace("px", "")), (n = parseInt(n, 10)), isNaN(n) && (n = 450)),
              "string" == typeof a && ((a = a.replace("px", "")), (a = parseInt(a, 10)), isNaN(a) && (a = 400));
          } catch (e) {
            (n = 450), (a = 400);
          }
          parent.postMessage(
            JSON.stringify({ eventId: "challenge-iframeSize", publicKey: "${publicKey}", payload: { frameHeight: n, frameWidth: a } }),
            "*"
          );
        },
      });
  }`;
};
Present waiting checkpoints
Some checkpoints require your application to wait before authentication can continue. IN_APP_VALIDATION requires an action on an external device, while LOADING requires no action from the user.
For both, display a waiting screen and make a long request to Solve a Checkpoint with an empty code. The endpoint responds when authentication completes, or when another checkpoint needs to be handled.
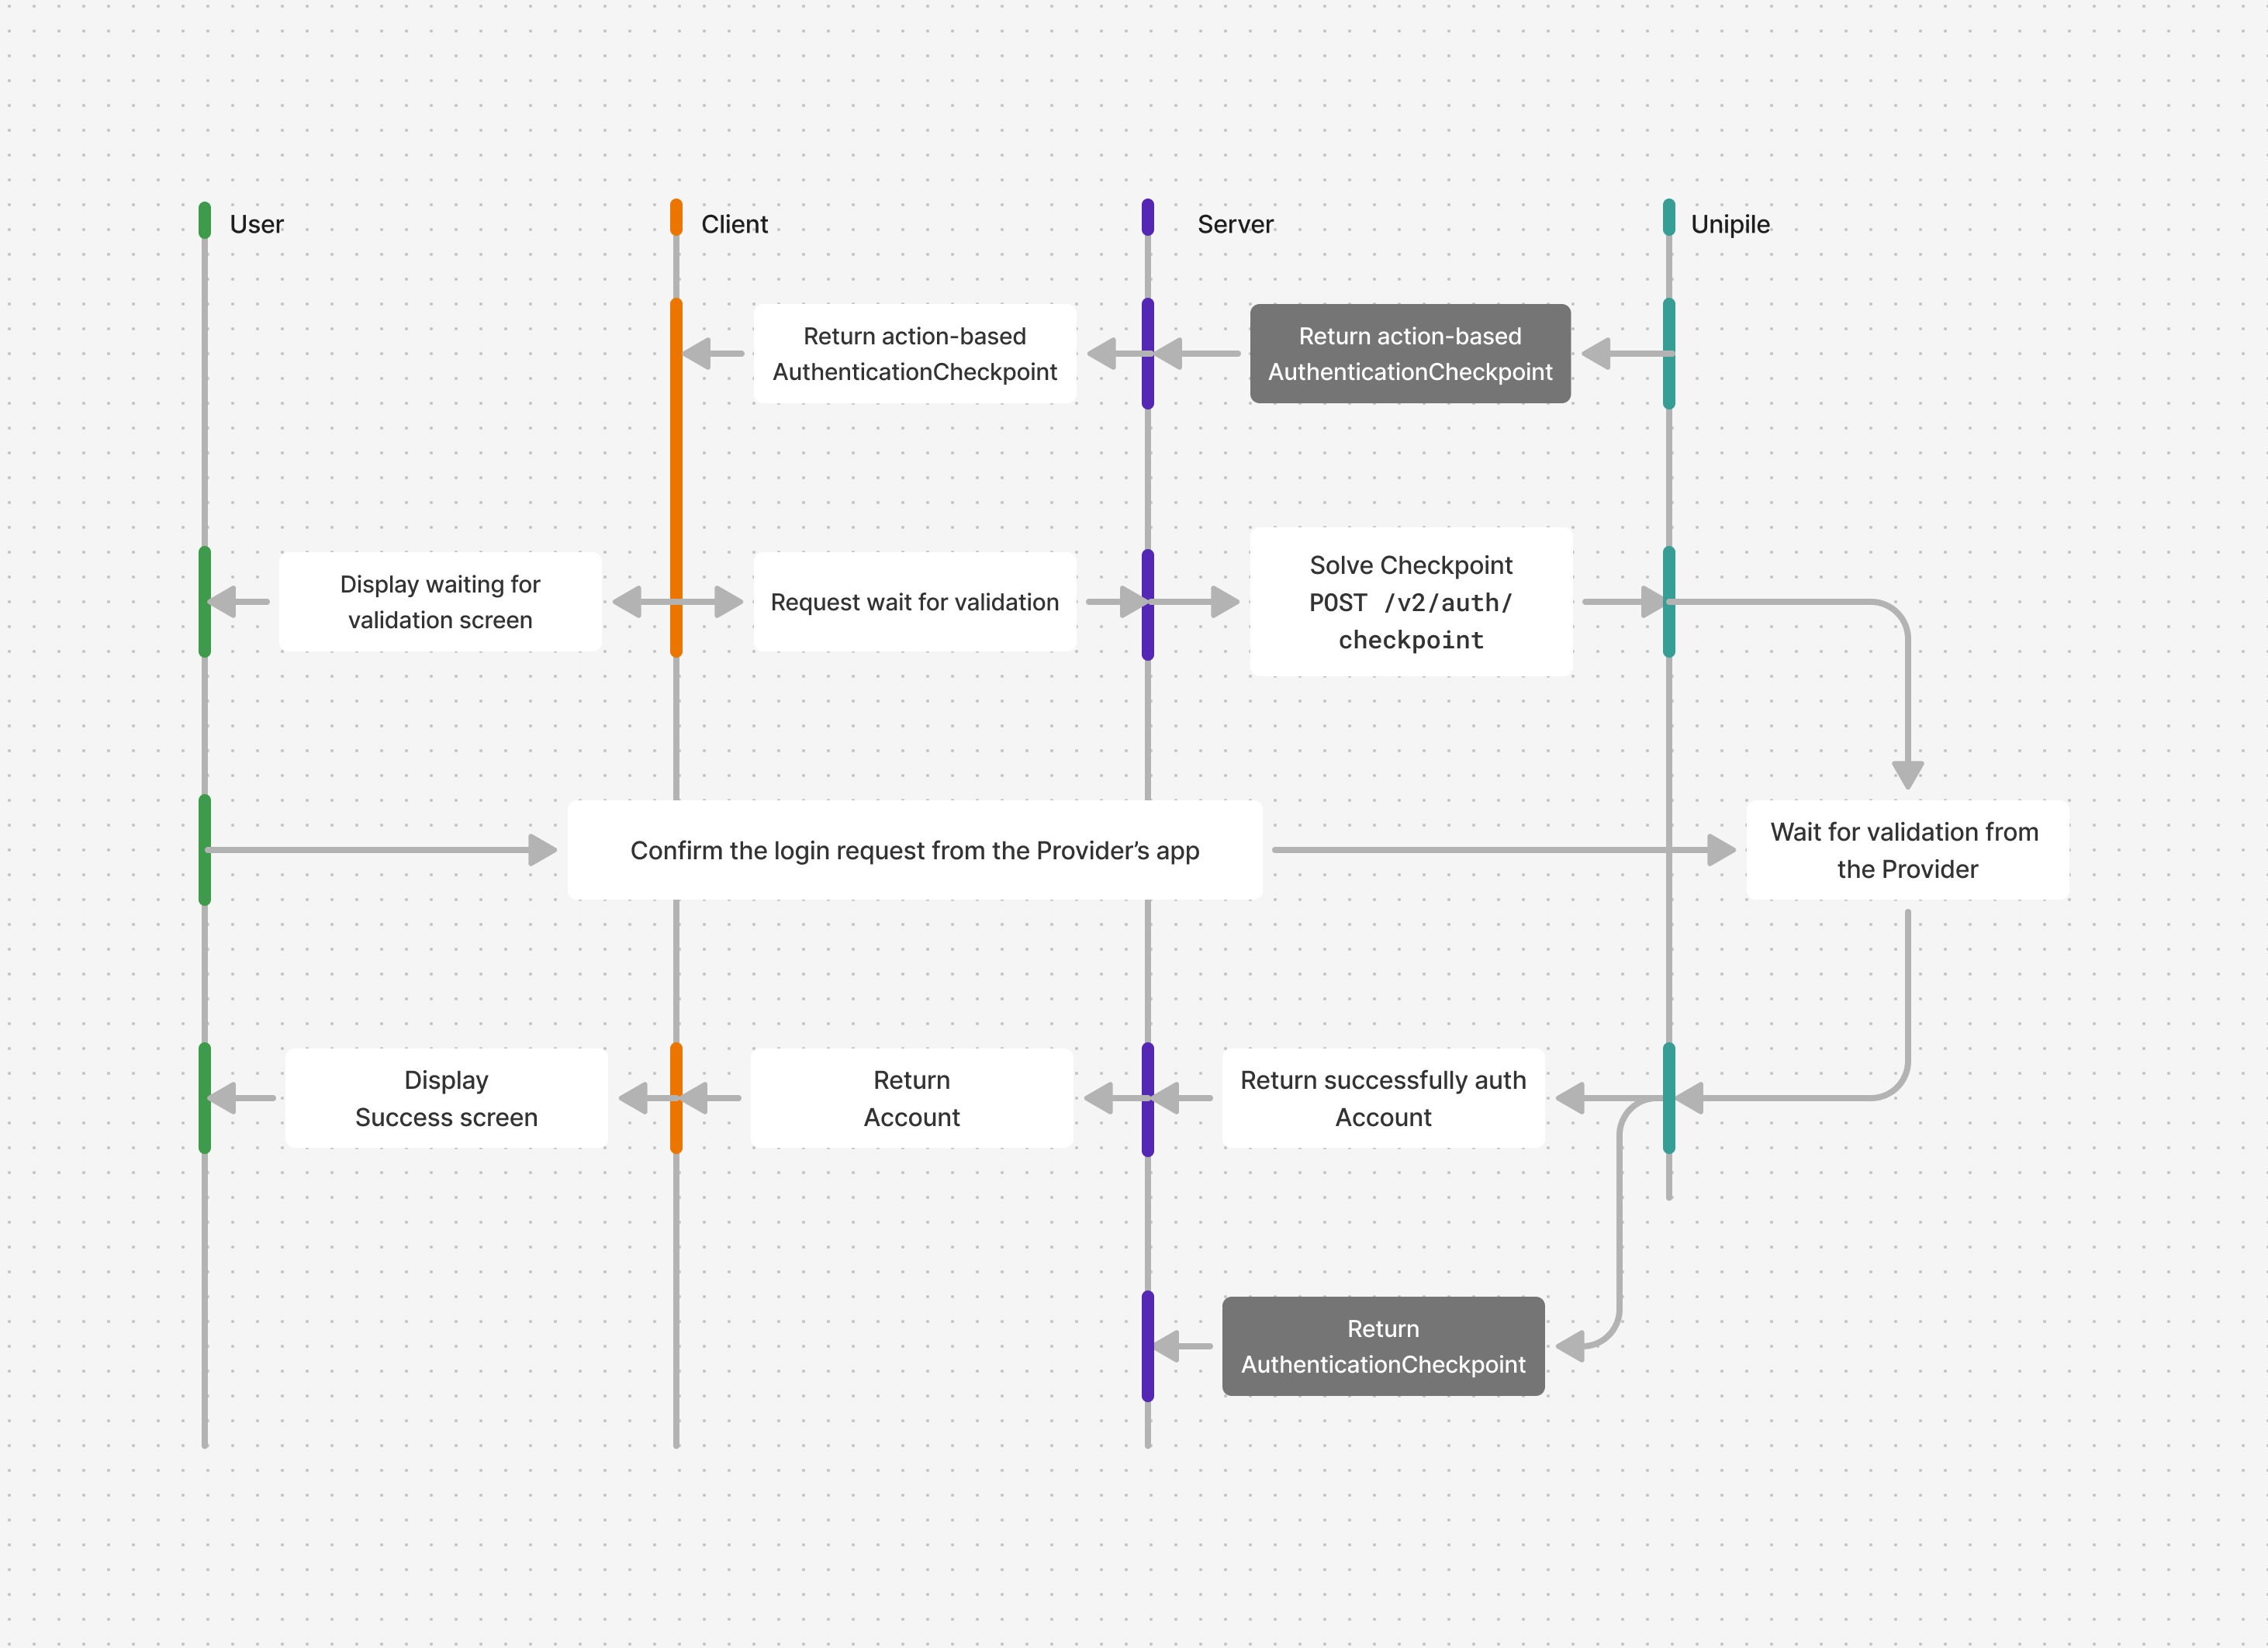
Display waiting screen
Update the screen to handle IN_APP_VALIDATION and LOADING:
- For
IN_APP_VALIDATION, indicate that the user should open the provider's application to validate their identity. - For
LOADING, show a progress indicator only: no action is expected from the user. - Immediately start the request to the previously created route, which waits by using Solve a Checkpoint.
Client code
// components/checkpoints/ActionCheckpoint.tsx

import { useEffect, useRef } from "react";
import type { SolveCheckpointResponse } from "unipile";
import { solveCheckpoint } from "../../lib/unipile";

export function WaitingCheckpoint({
  title,
  intent_id,
  onSuccess,
}: {
  title: string;
  intent_id: string;
  onSuccess: (data: SolveCheckpointResponse) => void;
}) {
  const waiting = useRef(false);

  useEffect(() => {
    if (waiting.current) return;
    waiting.current = true;

    solveCheckpoint({
      intent_id,
      code: "",
    }).then(onSuccess);
  }, []);

  return (
    <div>
      <h1>{title}</h1>
      <p>Completing authentication...</p>
    </div>
  );
}
Updated 16 days ago